|
Purchasing your first home is a wild mix of emotions. It’s exciting, fun, and a little scary. Once you are finally pending on your new place it seems like getting to the closing date takes forever. After that day finally comes and the chaos of moving and unpacking commence you may realize that you are missing a few homeowner essentials and begin wondering what else you may come across needing throughout the course of the year. Whether your home is quaint or enormous, small yard or acres of land, new or old, there are a handful of commonly used items within a home that are handy, if not incredibly necessary, to add to your home as time and budget allows. I do find it to be immediately necessary to obtain a vacuum as well as a lawnmower (unless you do not have grass or have hired out yard maintenance, so kept them off of the top 10 considerations as they are a must. 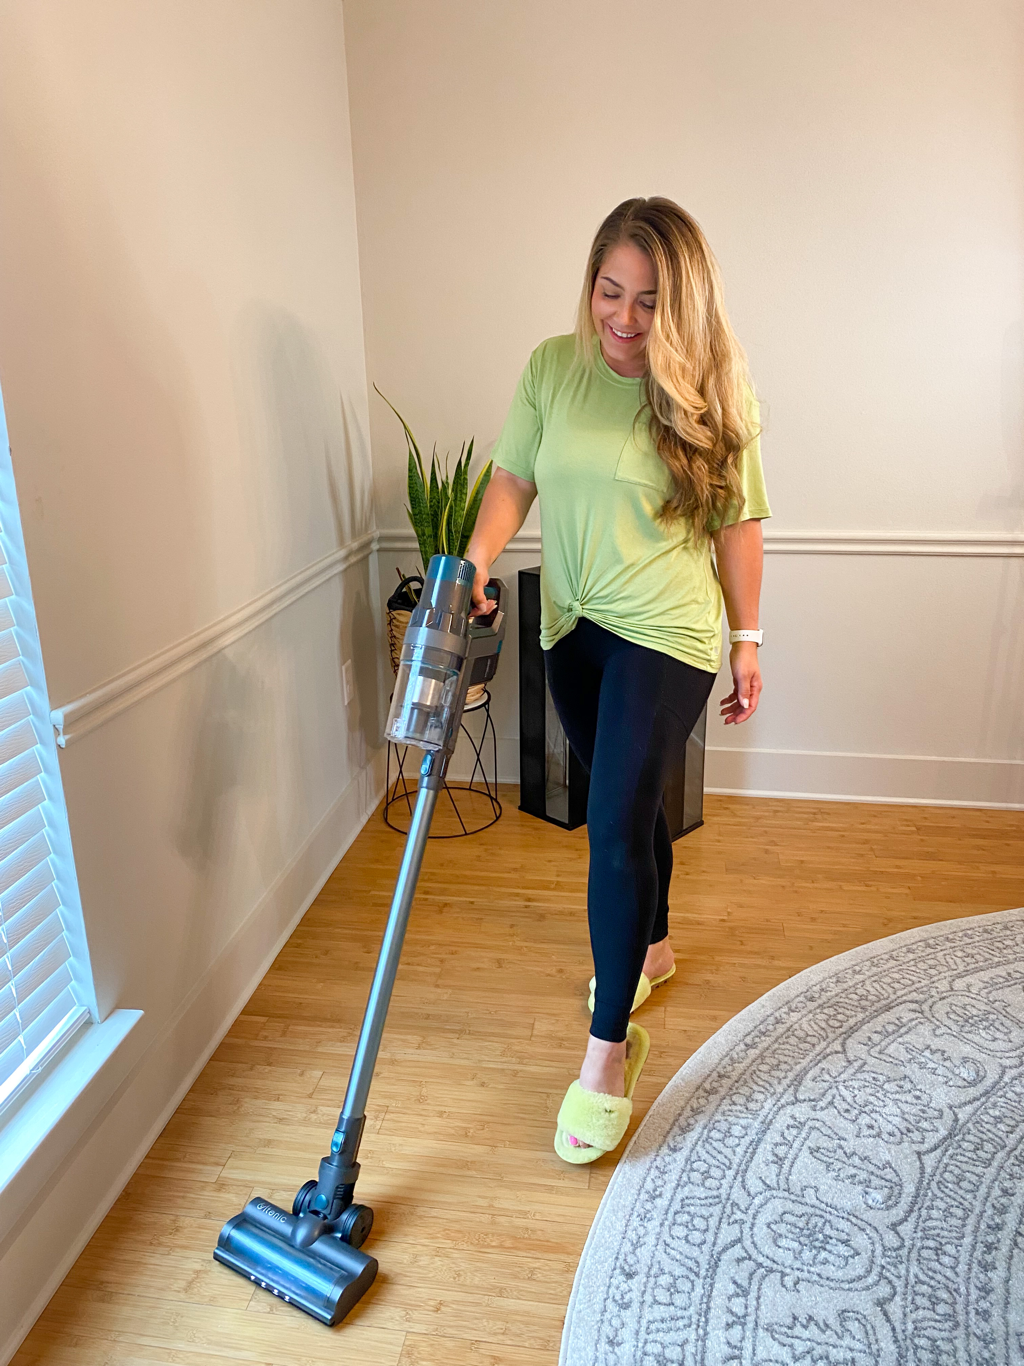 10 Things to Consider Investing in Once You Purchase Your First Home1. Tool KitA basic tool kit can help you out in a wide variety of situations. I recommend it at least include a hammer, nails, tape measure, screwdriver and wrench. 2. First Aid KitA first aid kit filled with supplies and tools to handle minor injuries is a must around the house. Having the supplies packed conveniently in a kit saves you time and money, plus you have the option to take it on the go if needed. 3. Fire ExtinguisherBeing able to quickly put out or suppress a small fire before it grows or the fire department is able to arrive, can save lives and property. It’s a good idea to keep one on every floor of your home. 4. PlungerThough rarely used, it’s something you don’t want to be caught without! 5. FlashlightIt’s so important to have a good flashlight readily available. Handy in times of power outages, when you need to check on an outdoor issue at night, when going into a crawl space or attic, etc. 6. Extension CordThe ability to power your devices, both indoor and outdoor, from farther away and/or multiple devices at a time is so convenient. Extension cords come in various lengths and colors as well if you are looking to match your flooring for indoor use. 7. Ladder/Step StoolWill you be replacing lightbulbs or changing out fans/light fixtures? Getting a ball off of the roof? Trimming your trees? Painting? Putting up Christmas lights? A ladder or step stool serves multiple purposes around the home. 8. HoseA necessity for yard and plant up keep, car washing, and driveway cleanup. 9. ShovelAn essential when moving dirt, gravel, snow, or bark. It can also be used to edge your yard, dig trenches, dig holes for fence posts, lifting sod and more. 10. TarpThis can be used for a wide variety of reasons. To cover a grill or a car, lay down prior to painting, spread out across a vehicle bed or interior prior to loading rocks, plants or bark, to cover and protect plants during a cold front, etc. Shop Our List HERE. Additional items that can be incredibly useful around the home but are typically used less frequently include a wheelbarrow, rake, leaf blower, string trimmer, edger, drill, saw, and shop vacuum. Any additional items you’d recommend?? Share in the comments! This post was written in partnership with The Jerry Blankers Team and is published at www.jerryblankers.com/blog. All opinions are my own. If you are in need of a realtor in Whatcom County, WA, we used them for our most recent land purchase and home sales and I highly recommend them! You can give them a call at 360-410-1297 or email [email protected] or [email protected]. Instagram: @blankersrealestate
2 Comments
Now that we all have Spring Cleaning on our minds I thought it would be the perfect time to go over some of our favorite household cleaning products! I love picking out fresh scents and new products for the season; it really helps me get excited about cleaning. Mrs. Meyer’s Clean DayFrom the sleek, colorful packaging to the simple, garden inspired scents, Mrs. Meyer’s Clean Day has been a household favorite of mine for years. We regularly use their dish soap, hand soap and room freshener though their product list is much more extensive than that. Mrs. Meyer’s products are made with cruelty-free formulas containing essential oils and other thoughtfully chosen ingredients. They are formulated for use in a home with children and pets. I love that the range of products all come in every scent so that you can choose a singular scent for your home or for each bathroom, kitchen, etc. Our favorite scents are Honeysuckle, Pear Tree (Limited Edition), Lavender and Lemon Verbena. Shop Mrs. Meyers by clicking HERE.  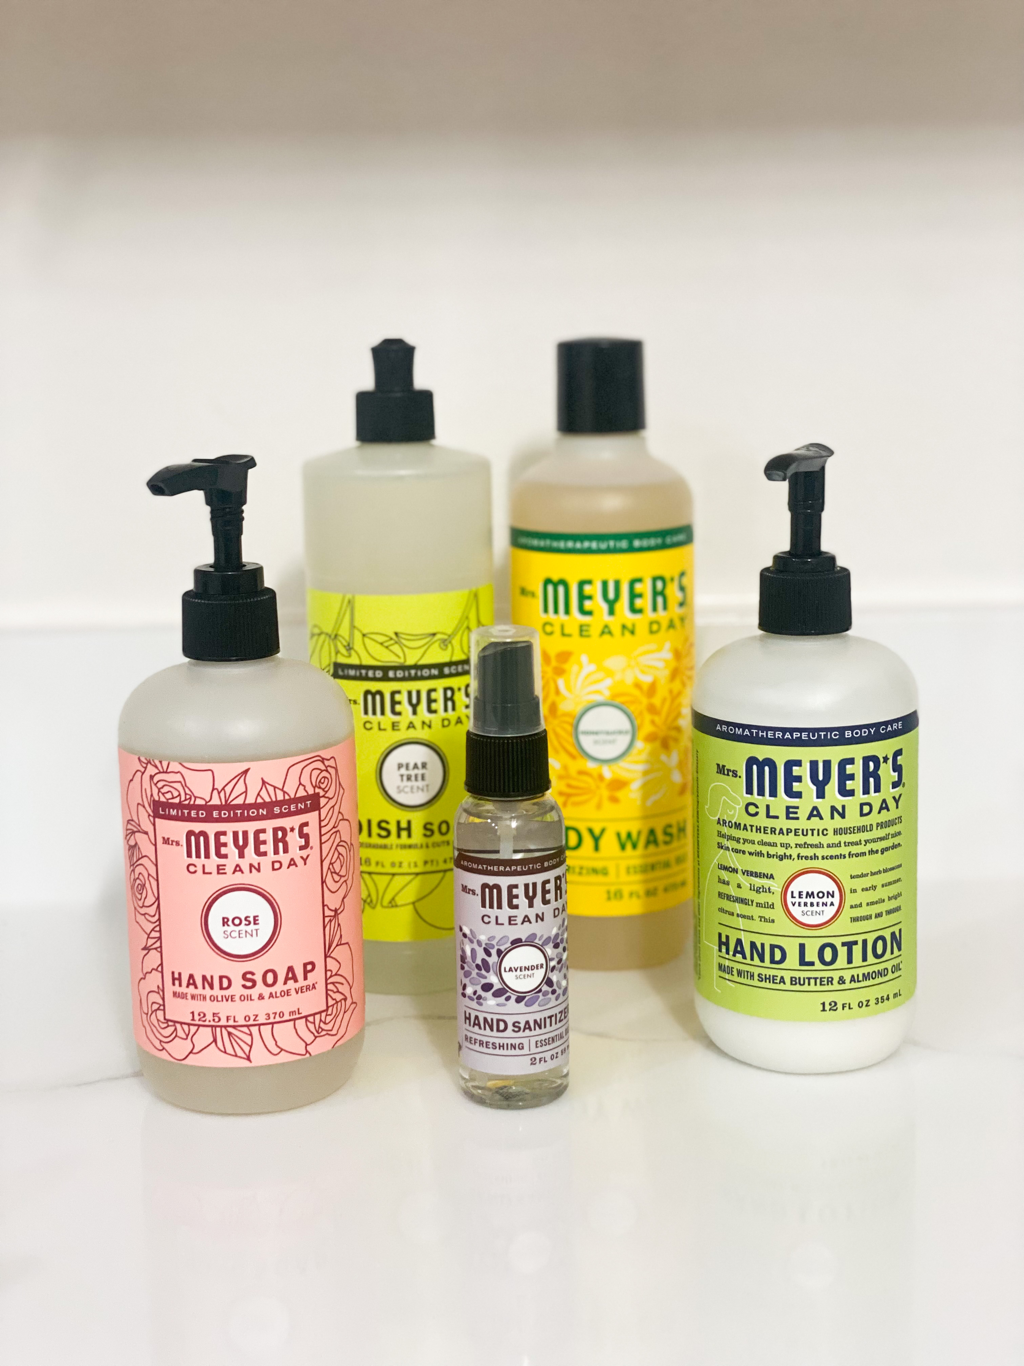 Cordless VacuumA powerful vacuum is a household essential and I find a cordless, lightweight vacuum to be incredibly helpful. Being able to move around the house as you please without having to unplug the vacuum or worry about tripping over the cord is so convenient. This particular one is available on Amazon and comes with multiple attachments which make cleaning sofas, mattresses, cars, cribs, mattresses, etc. much easier. Shop this cordless vacuum on Amazon HERE. 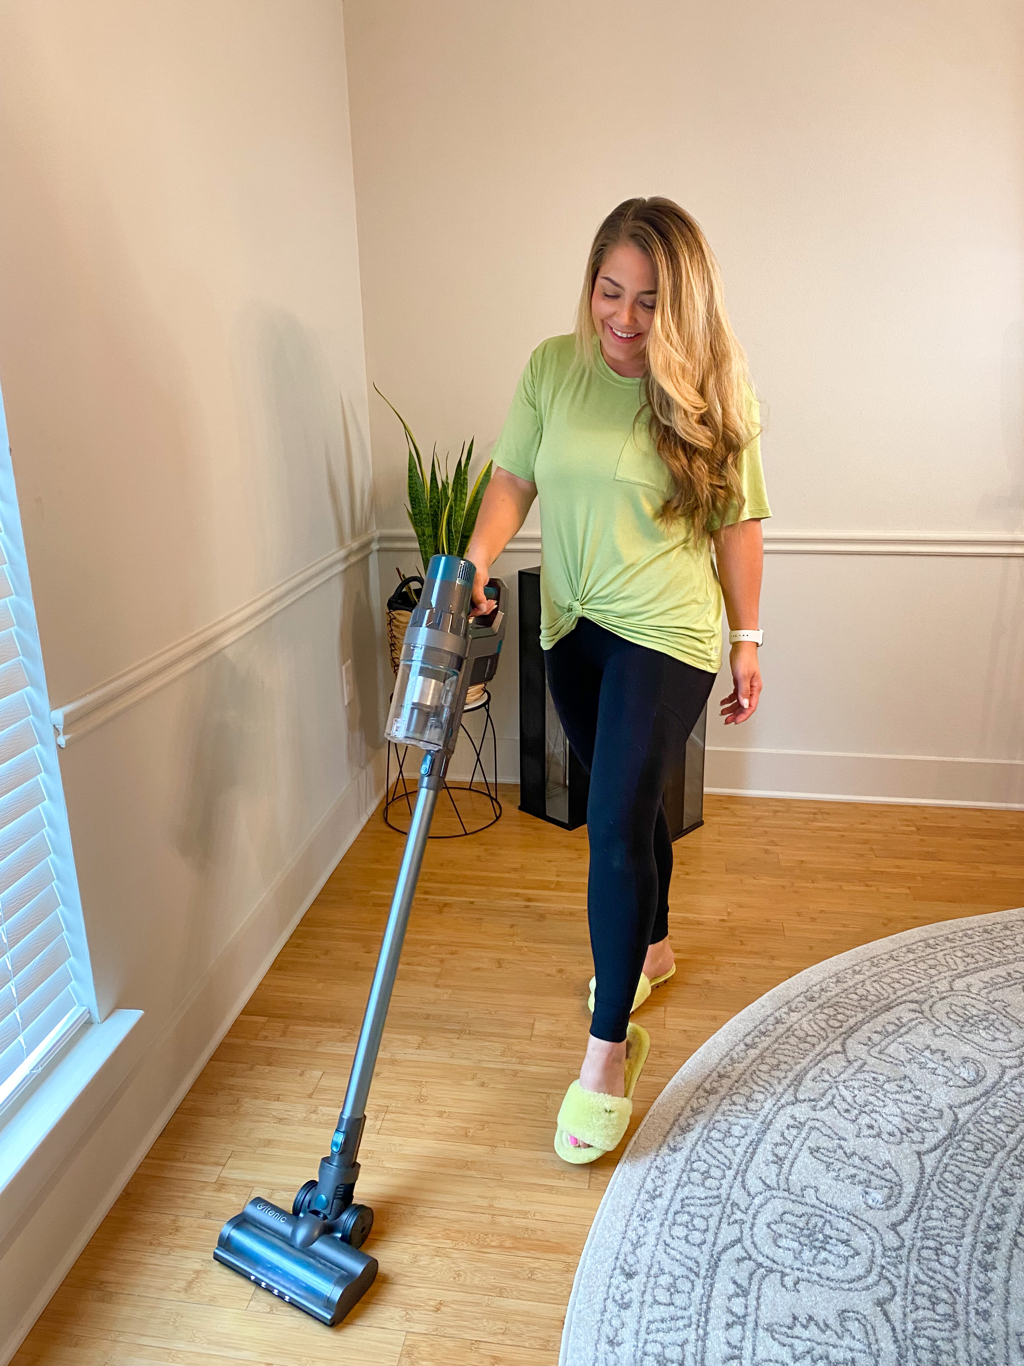 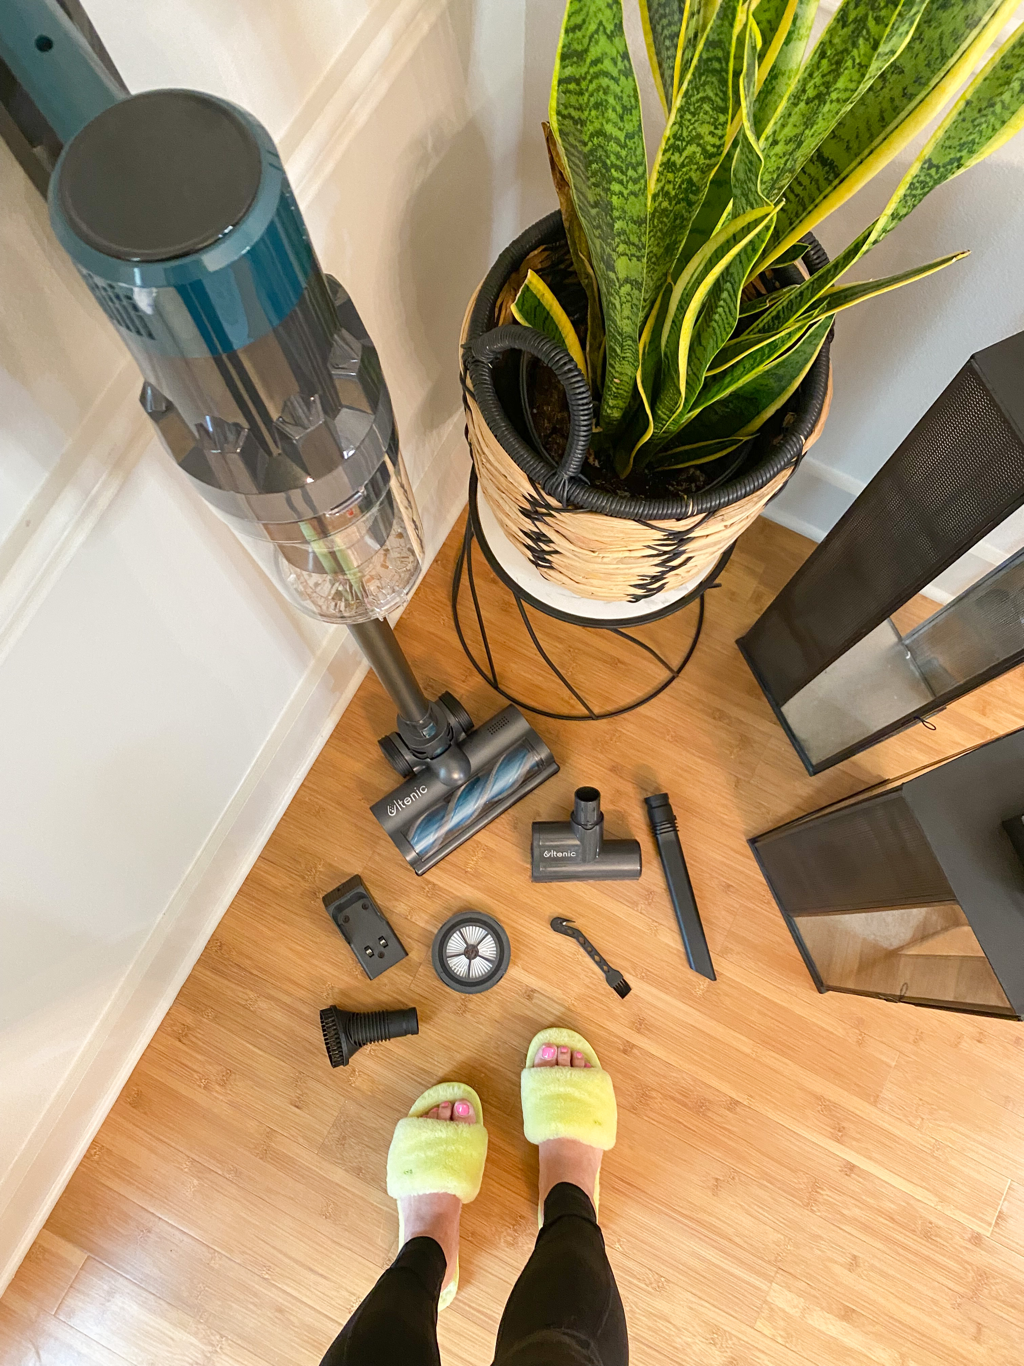 Multi-Surface Spray MopFor quick, easy mopping I love to use my spray mop after vacuuming up the crumbs and dirt. I’ve had this one for years and it does a great job of cleaning hard surface floors without having to get down on your hands and knees or use a bucket of water. The residue-free cleaner it comes with has a light, pleasant scent and the microfiber cleaning pad can be tossed right into the washing machine. Shop this spray mop HERE. 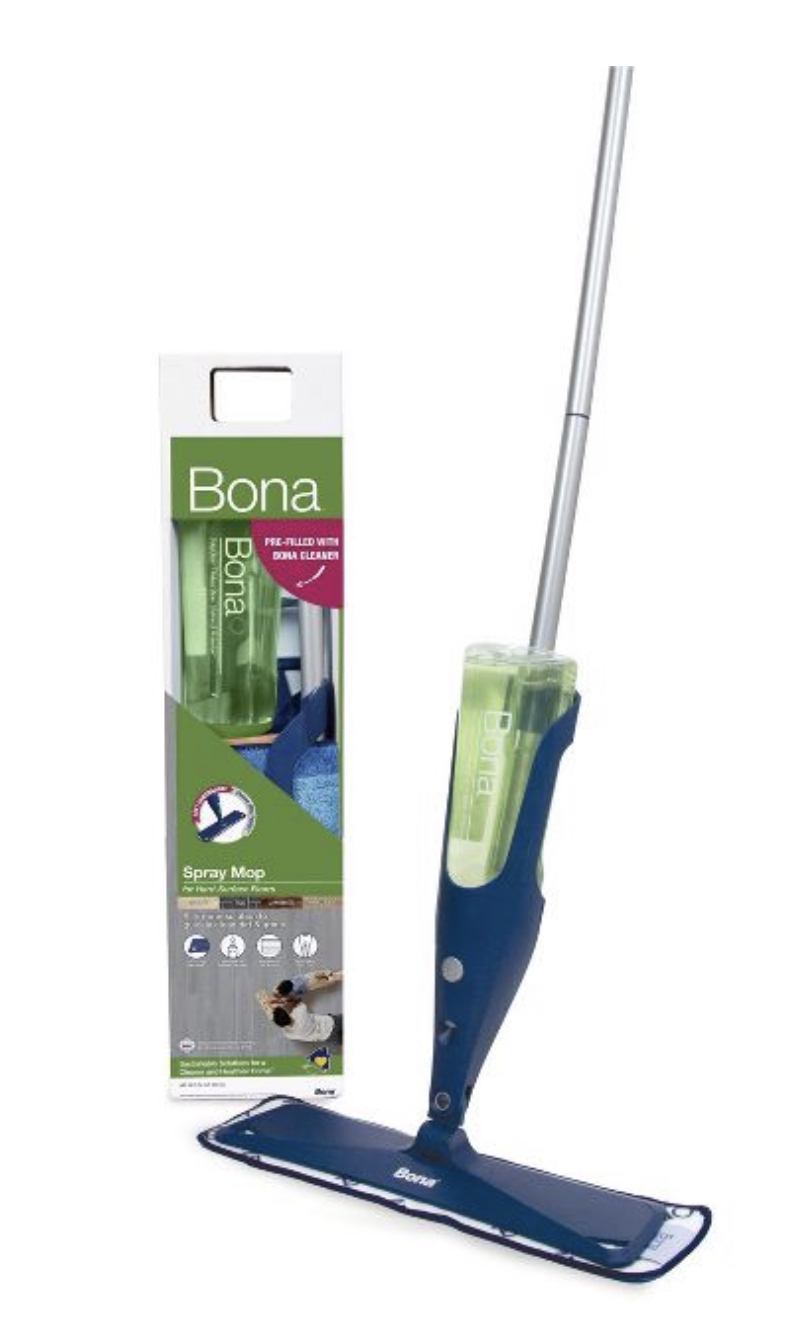 Bathroom CleanerWhen it comes to bathroom cleaner, I don’t mess around. I look for products that get the job done quickly and efficiently. I love these Oxi Clean multi-purpose disinfectants. They can be found at most major retailers/grocery stores which also makes it an easy, convenient purchase. Not only do I feel good knowing it kills 99.9% of bacteria but I also enjoy both the citrus and fresh scents. They make my bathrooms smell so clean without being too overpowering. Shop Oxi Clean on Amazon HERE. 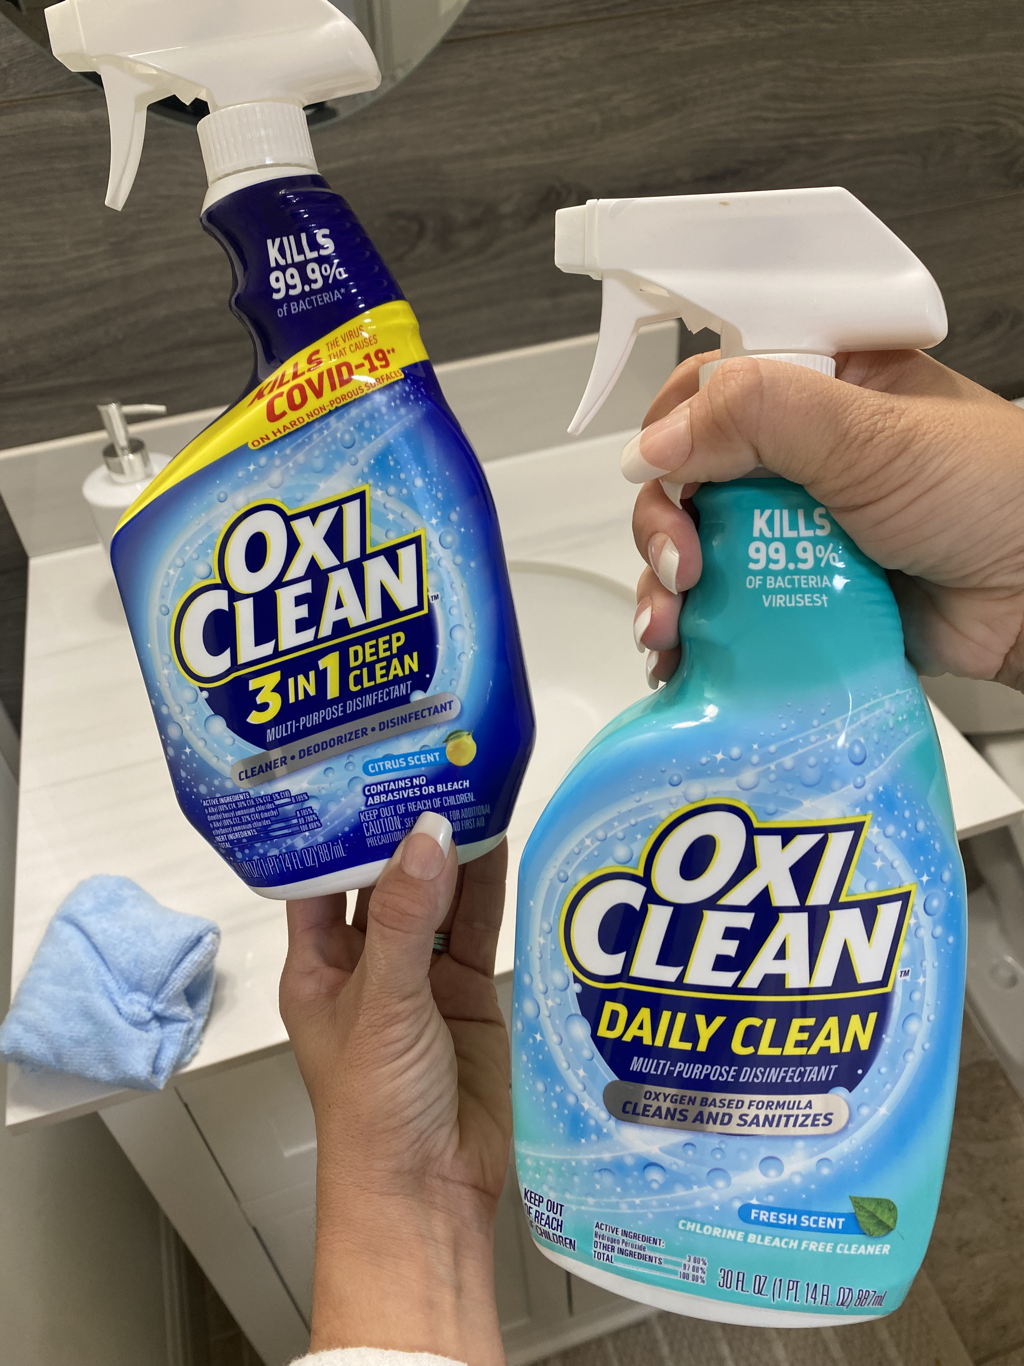 Microfiber Cleaning ClothsThese are a must if your desire streak-free, lint-free results when cleaning. Microfiber cloths are great on household surfaces as well as in vehicles and boats. They are very absorbent, dry quickly, are durable and are machine washable so you’re able to use them hundreds of times. They come in multiple color options too! Shop microfiber cleaning cloths HERE.  Mr. Clean Magic EraserMagic Erasers have been trending the last few years and for good reason: they do wonders on a wide range of surfaces! They provide a powerful clean with no harsh chemicals added. Simply wet, squeeze and get to cleaning. They can be used to clean anything kitchen messes and bathtubs to car wheels, shoes and outdoor furniture. Shop Magic Erasers HERE.  What household products and cleaners do you use and love? Any of these? We’d love to hear about it in the comments! This post was written in partnership with The Jerry Blankers Team and is published at www.jerryblankers.com/blog. All opinions are my own. If you are in need of a realtor in Whatcom County, WA, we used them for our most recent land purchase and home sales and I highly recommend them! You can give them a call at 360-410-1297 or email [email protected] or [email protected]. Instagram: @blankersrealestate
It’s that time of year again! Birds are chirping, sun is shining (at least sometimes!) and we are getting eager to organize, declutter and refresh. Spring cleaning can be daunting but when you break it down into smaller tasks and go at it one at a time it’s far more manageable. Whether you are looking to list your house soon to sell or just looking to start fresh, the rewards of spending some time now to spring clean and declutter can make a big difference in your daily life going forward. Many tasks can be easily missed with routine weekly cleaning and organizing so we’ve created a round up of spring cleaning tasks to check off this year.  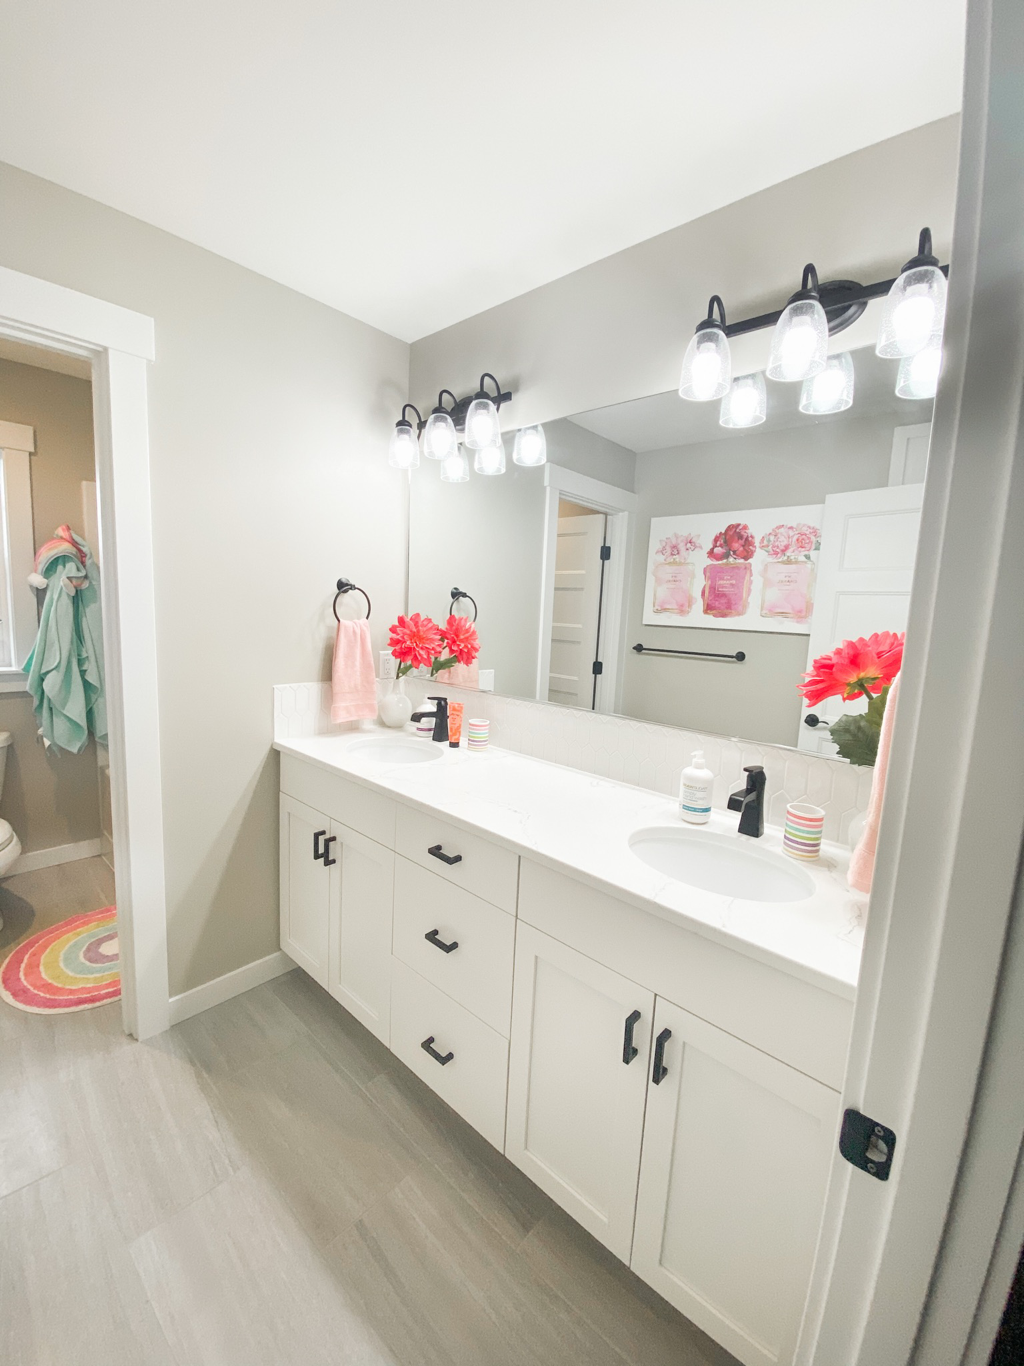 Interior Tasks•change decor •clean baseboards •wipe down furniture •vacuum under and between couch cushions •clean out refrigerator •clean out freezer •dust ceiling fans •dust skylights •dust vents •clean out pantry and organize •vacuum curtains •replace air filters •toss old and expired makeup •toss old and expired pantry items •toss expired medicine •clean out nightstands •replace burnt out lightbulbs •touch up any scuffs on the walls •fix anything that’s broken   Exterior Tasks•wipe patio furniture •wash patio furniture cushions •wipe window panes •wipe down decor (outdoor lanterns, candles, tables, etc) •repair any damaged fencing, deck/patio, etc •replenish bark •pull weeds •pull and replace dead flowers, bushes, etc •replace burnt out lightbulbs •pressure wash or spray off driveway, sidewalks, patio(s) •fix anything that’s broken  Items to Declutter•winter clothing and shoes that did not get worn/too small •kid’s bikes, scooters, roller blades, etc that they’ve outgrown •old towels •excess kitchenware **Bonus Task**Clean out your car! Get rid of any garbage, duplicates and unnecessary items. If you keep diapers, change or clothes or toys in the car for your kids make sure they are the current size/age appropriate items and swap if necessary. Vacuum and wipe down the interior for exceptional results that will keep your smiling every time your hop in!   This post was written in partnership with The Jerry Blankers Team and is published at www.jerryblankers.com/blog. All opinions are my own. If you are in need of a realtor in Whatcom County, WA, we used them for our most recent land purchase and home sales and I highly recommend them! You can give them a call at 360-410-1297 or email [email protected] or [email protected]. Instagram: @blankersrealestate
Our last post went over top questions to ask yourself when setting up your home office and how to make it a productive, organized and comfortable space suited to your needs. Now we will touch on the top items to consider adding to your office to help with this. From the big things like a desk and chair to the small things like paper clips and pens, taking care of the details right away will set you up for success. Here are helpful items we recommend adding to your home office: 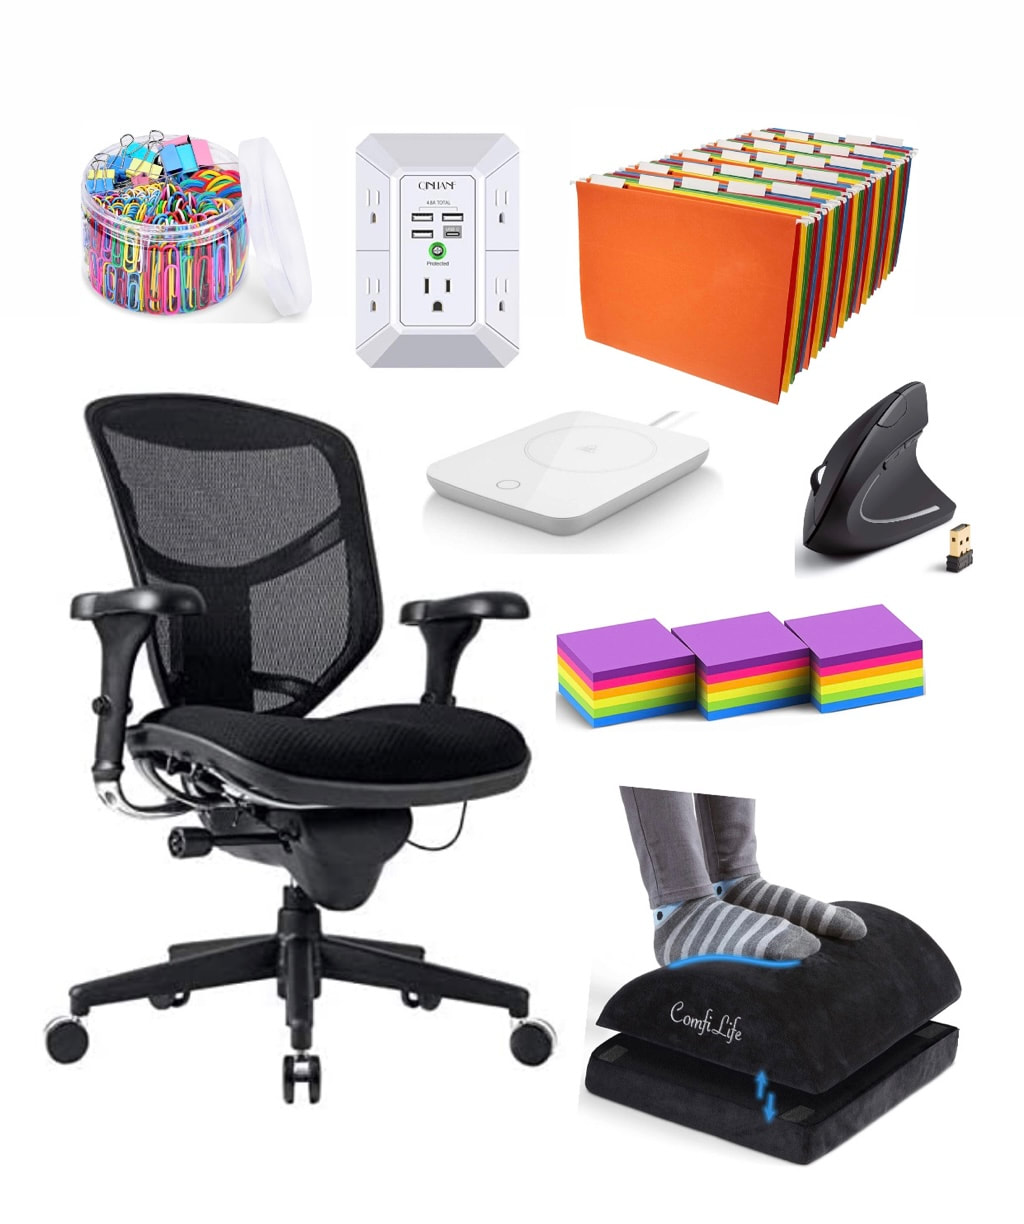 Office Items to Enhance Comfort & Efficiency•ergonomic chair •surge protector power strip •noise cancelling headphones •laptop stand •ergonomic keyboard •ergonomic mouse •good lighting (new light fixture, lamp, etc) •standing desk with anti fatigue floor mat •coffee mug warmer •password book (only recommended in home offices where you aren’t at risk of others having access to it) •mousepad with wrist support •ergonomic foot rest •lumbar support pillow •cell phone stand Standard Office Supplies•pens •Sharpie •highlighter pen •notebook/notepad •sticky notes •printer •printer paper •backup printer ink •paperclips •envelopes •blank cards •stamps •laptop/computer •stapler and staples •desktop organizer •binder clips •scissors •tape •bookshelf •paper shredder •dry erase board and markers •file folders and desk drawer/cabinet/container to keep them in •trash can Is there anything else that you can think of or that you use personally that has made a difference in your office space? We’d love to hear about it in the comments! This post was written in partnership with The Jerry Blankers Team and is published at www.jerryblankers.com/blog. All opinions are my own. If you are in need of a realtor in Whatcom County, WA, we used them for our most recent land purchase and home sales and I highly recommend them! You can give them a call at 360-410-1297 or email [email protected] or [email protected]. Instagram: @blankersrealestate
Whether you work from home or not, having an organized, well functioning office space can help eliminate stress and frustration. Having a dedicated office space, whether it be a room, a closet, a desk or a nook somewhere in your home can be key to keeping your life in order. This can be a place you work from daily or simply where your store your important documents and stationary. If you will be using your office space frequently, say for your full-time job, it is important to set up and create your space in a way that will boost your productivity. You don’t want to be able to see household tasks lingering beyond your computer screen that may cause you to lose focus and get off track. 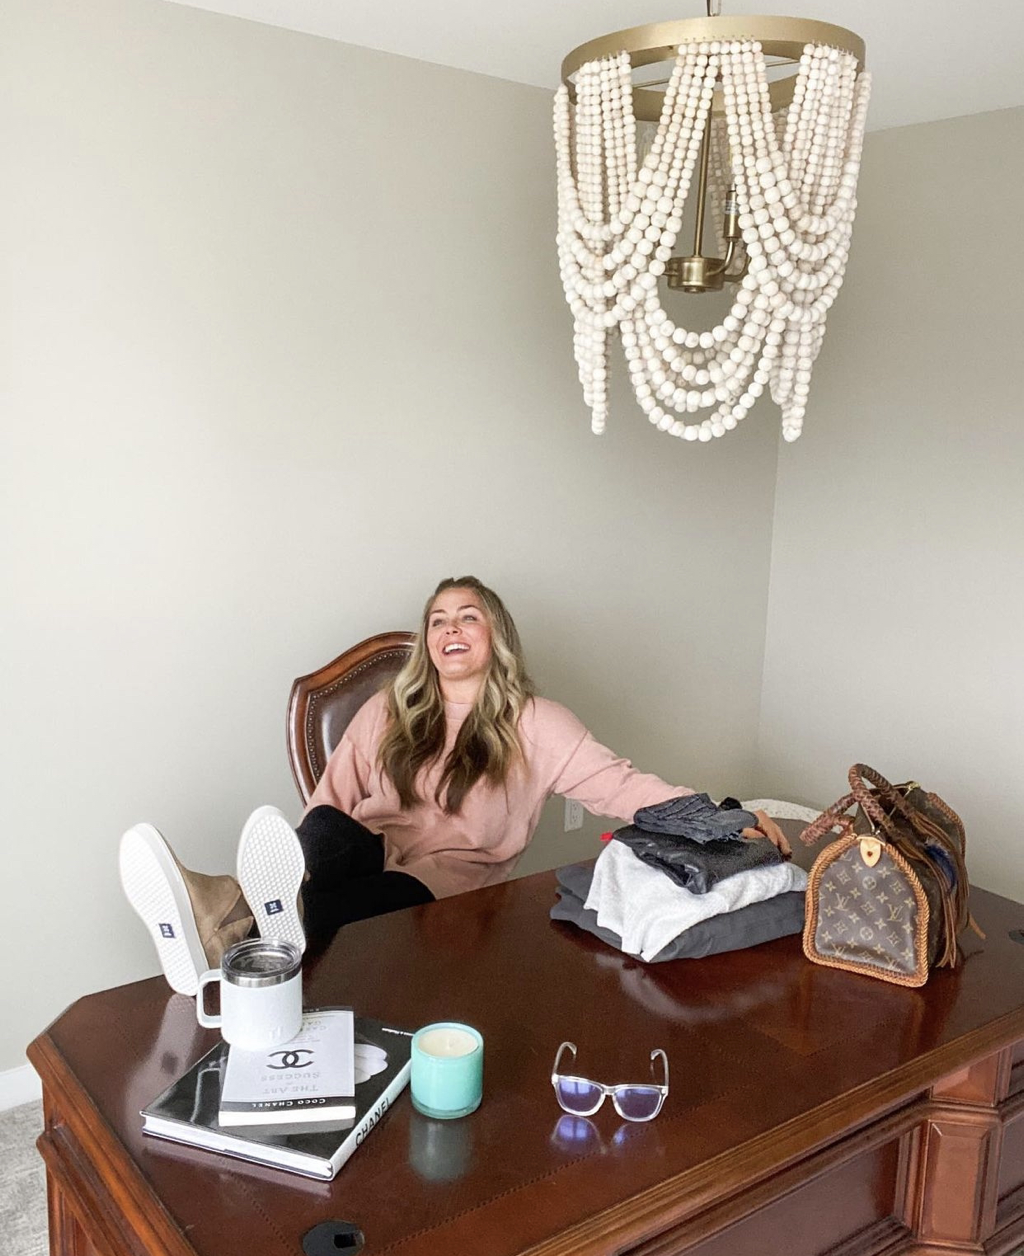 When designing your office space here are the main questions you’ll want to ask yourself: 1. Is it comfortable?Comfort is key to allowing you to focus and stay on track. This may vary based on your line of work. If you are on the phone a lot, this may mean you need to find a comfortable headset that allows you to talk without having to hold the phone up to your ear. If you are sitting a lot, this may mean finding the perfect chair for you. Standing desks as well as desks with a stationary bike or treadmill have become popular in recent years too. 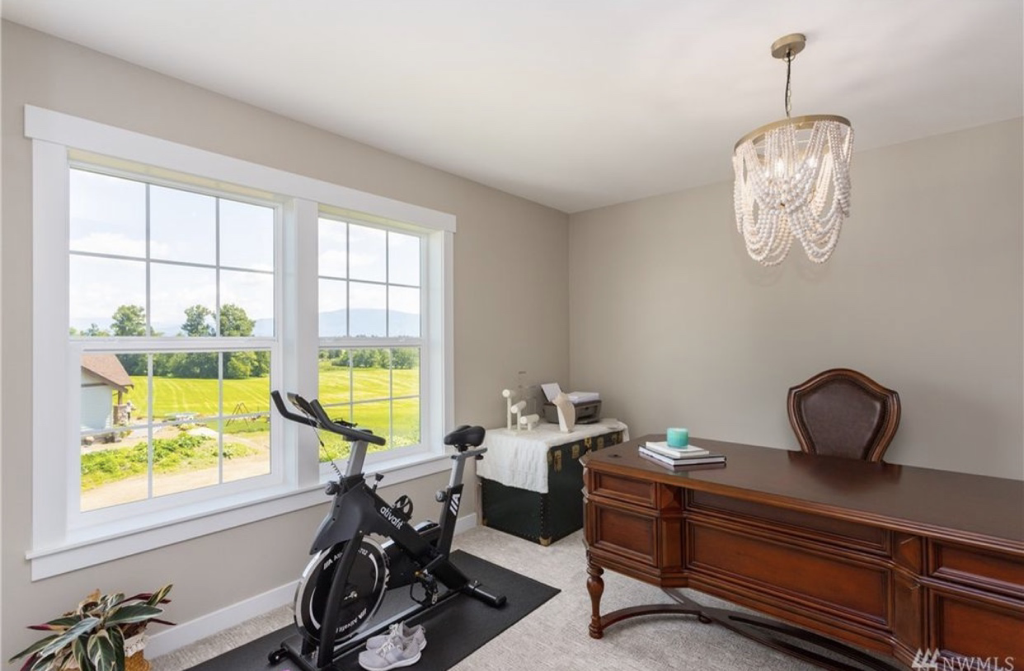 2. Is it free of distractions?I recommend keeping decor simple and extras at a minimum. It is ideal to have a desk with drawers that you’re able to dedicate to filling with items such as a stapler, envelopes, paper clips, etc. so that those items are within reach without having to sit out in the open. The more open and clear space you have by the computer, the better.  3. Does it inspire me?This can vary so much dependent on your job, personality, and the purpose of your office space. If you worked hard for a degree that lead to your profession, this may mean hanging your degree(s) on the wall to remind and inspire you. If you are a creative you may want to showcase your favorite quote, piece of art, or something that you created and are proud of. Do you have a dedicated office space? In my next post I will be going over the top items you need in your office space to allow you to be the most productive, organized and comfortable. This post was written in partnership with The Jerry Blankers Team and is published at www.jerryblankers.com/blog. All opinions are my own. If you are in need of a realtor in Whatcom County, WA, we used them for our most recent land purchase and home sales and I highly recommend them! You can give them a call at 360-410-1297 or email [email protected] or [email protected]. Instagram: @blankersrealestate
Does diving into 2022 have you wondering what the new trends in home decor and design will be? Today I’ll touch on ten trends for 2022. I always love hearing what the new trending styles are but also encourage you to not take it too seriously. I believe you should decorate and design your home how best fits your family and based on the colors and styles that you enjoy. However, learning about the on trend styles can give you great ideas that you do love too, just never thought of, which can be really fun. Typically the on trend styles are easy to shop for and find, even at the more affordable big name stores. Geometric Shapes & PatternsSquares, triangles, hexagons and more fun geometric shapes are booming in popularity. Some examples of places this is popping up is in tables, chairs, vases, and other tabletop decor. 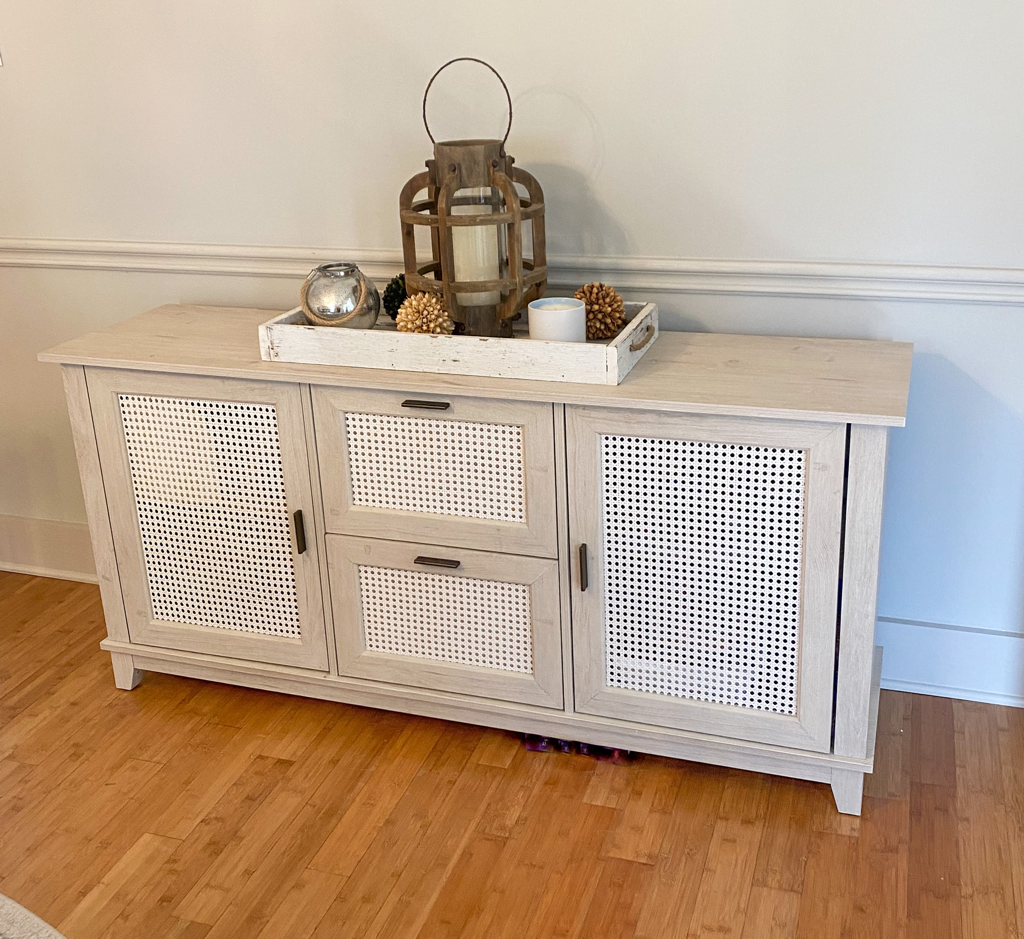 Natural MaterialsIncorporating natural materials adds warmth and coziness to a space. Think rattan, cotton and jute. This can be in the form of baskets, lanterns, clocks and larger furniture pieces like tables and chairs. My egg chair pictured here is one of my favorite items in our home, it is cozy and unique, plus it adds personality to our space.  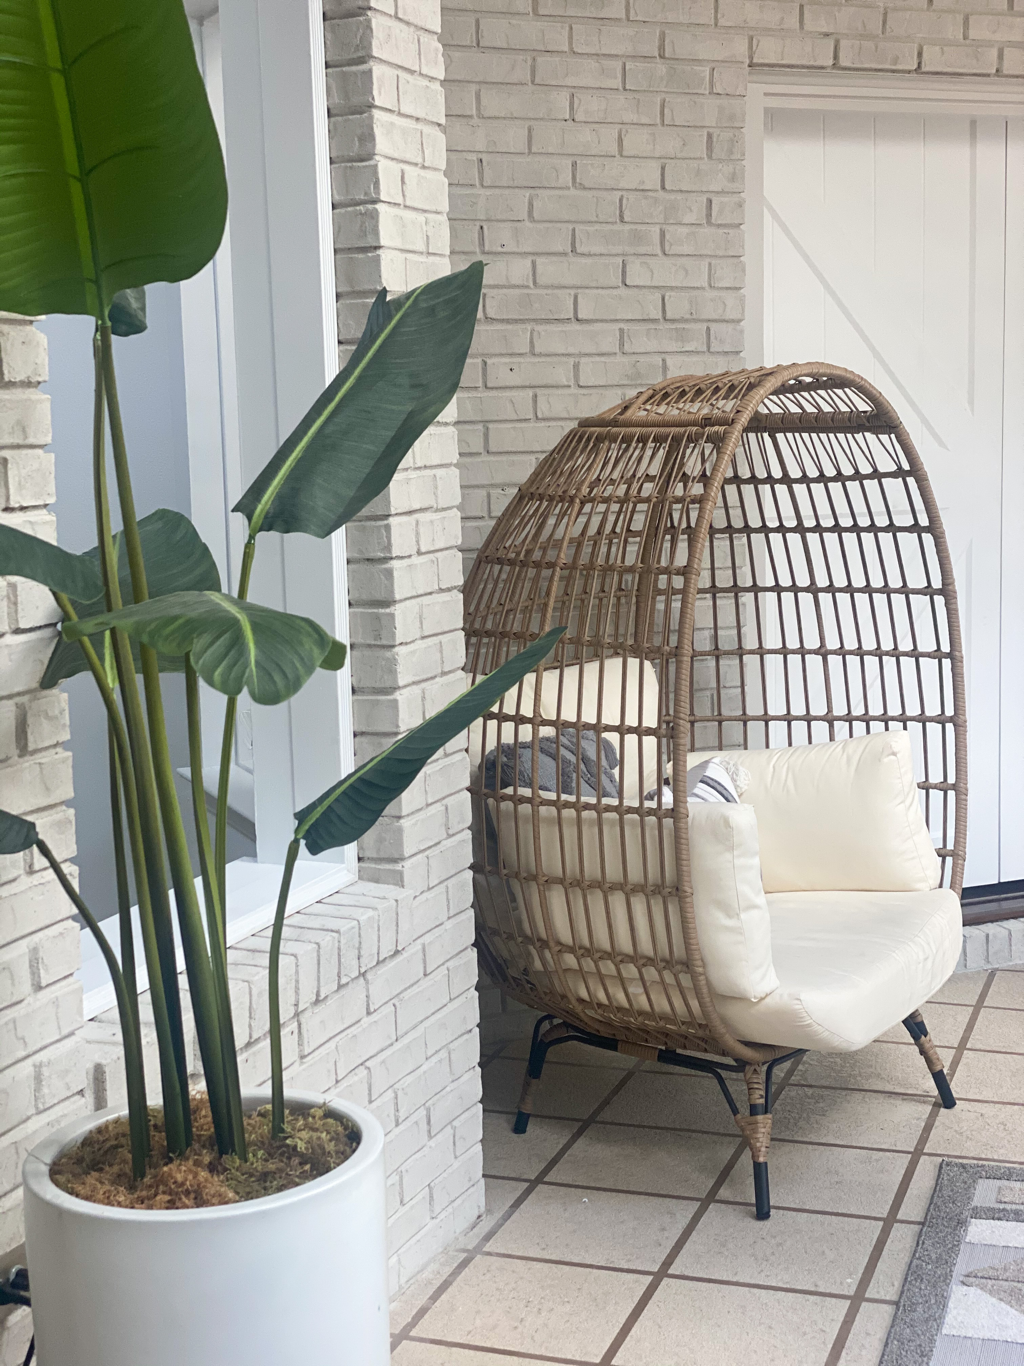 Lighter FloorsDark wood floors are on their way out and lighter woods such as white oak and French oak are trending for 2022. Wide-planks are the most common and desired this year.  MinimalismSociety as a whole is starting to part with unnecessary possessions and take greater thought into deciding what we put in our homes. The desire to have a well thought out, relaxing home free of clutter is the goal going into 2022. Incorporating GreenGreen is calming and soothing, associated with nature and growth. Olive and emerald tones are especially popular right now. Green can be incorporated as large furniture pieces such as a sofa, live or faux plants, candles, and even green cabinetry is skyrocketing in popularity. Black AccentsWhen it comes to trim, cabinet hardware, faucets, doors and light fixtures, black is the trending choice. It is also becoming a popular cabinet color, especially for a bathroom or a kitchen island.  Painted Interior DoorsI mentioned above how black is a trending color when it comes to hardware, fixtures and accents including doors, but painted interior doors in general have shot up in popularity. Now many homes feature light walls with dark interior doors that make a statement, adding depth and character. Comfortable Furniture PiecesAs we continue to spend more time at home, possibly more than ever before, quality, durable, comfortable pieces have become more desired. Say Bye to Stainless!The desire for stainless steel appliances is fading. White, black, and integrated appliances are coming back. Stainless will always be around as it is a commercial staple but higher value homes are looking to really wow guests and homeowners with the seamless look of integrated appliances or the high end features of more unique appliances.  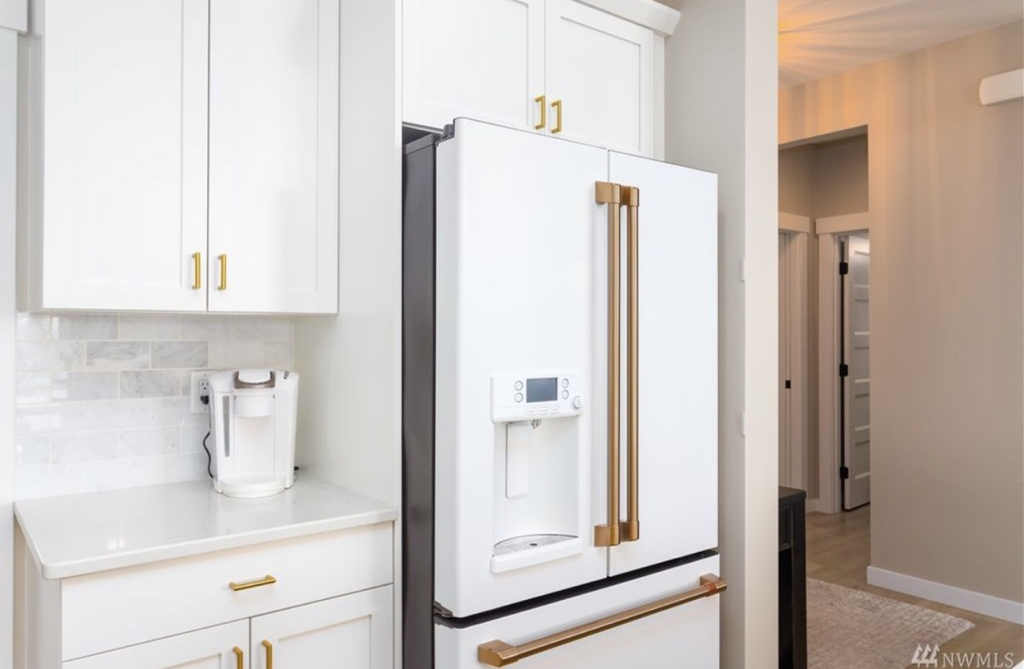 Outdoor Relaxation SpacesWith more people staying home more and many even working from home, outdoor relaxation spaces are on the rise. Even with a small backyard, patio or balcony you can create a beautiful, relaxing outdoor oasis. Having that special place to retreat to and refresh is strongly desired, especially with many having to cancel or postpone vacation plans this year. How to you feel about these 2022 trends? Have or will you incorporated any of them into your home? This post was written in partnership with The Jerry Blankers Team and is published at www.jerryblankers.com/blog. All opinions are my own. If you are in need of a realtor in Whatcom County, WA, we used them for our most recent land purchase and home sales and I highly recommend them! You can give them a call at 360-410-1297 or email [email protected] or [email protected]. Instagram: @blankersrealestate
Now that we are quickly approaching the end of 2021, I thought it would be a good time to go over ways to prep your home for the new year. With all the extra love and fun that the holidays bring, they also tend to bring additional clutter. More clothes, more toys, more snack foods and platters taking over the countertops, more decor (and afterwards trying to decide where and how to store it all)! I personally find myself more anxious and unable to focus when my home is disorganized. By taking a few steps to declutter and revamp your space now, you will save yourself a lot of time and headache come January. 1. Declutter Your WorkspaceThis is a great time of year to declutter your workspace (at home and/or your work office). Even if your work takes place outside of the home it’s the perfect time to take a few moments to file important mail, tax documents, and other papers away into their appropriate places and get rid of any excess, unnecessary items.  2. Reassess How Spaces are Being UsedTake a few moments to reassess your home. Are you using your spaces in the best, most appropriate way? Maybe a spare room that never sees guests should become an office and your “office” should stop taking over the kitchen table. Or maybe your kids have gotten older and the “toy room” can be put to more age appropriate use. By reallocating spaces to better suit yourself and your family’s needs you can eliminate a lot of clutter and stress, ensuring you walk into the new year feeling refreshed. 3. Clean Out Closets & DressersA big end of the year project for me that always makes a huge difference in our lives is cleaning out our closets and dressers. If you’ve gone a whole calendar year without wearing something, 99% of the time it is time to let it go. I do keep a few sentimental or special occasion items that don’t get worn often but that is minimal. Some items I have chosen to hold onto include my wedding dress, my daughter’s dance recital costumes and a few sentimental baby items. Oftentimes many of my children’s spring/summer pieces don’t fit them anymore by the time year end arrives and with it being out of season anyway there is no need to hang on to them to assess the following year. The sooner they can be consigned or donated, the better.   4. Get Rid of Extra/Unused KitchenwareThis is one that I’m guilty of. Even with our big purge before our cross country move, I am finding that I hung on to too much. I have too many pots and pans, too many Tupperware containers, too many serving platters, etc. I am currently working through and determining my favorite pieces as well as the ones that are used the most often and will be donating the rest. The same will be happening with our extra cups, spatulas, silverware, etc as well as small kitchen appliances that don’t get used enough. If you have children you may also want to consider going through your stash of bottles, sippy cups, divider plates and more to eliminate those from your cupboards if they are no longer needed. 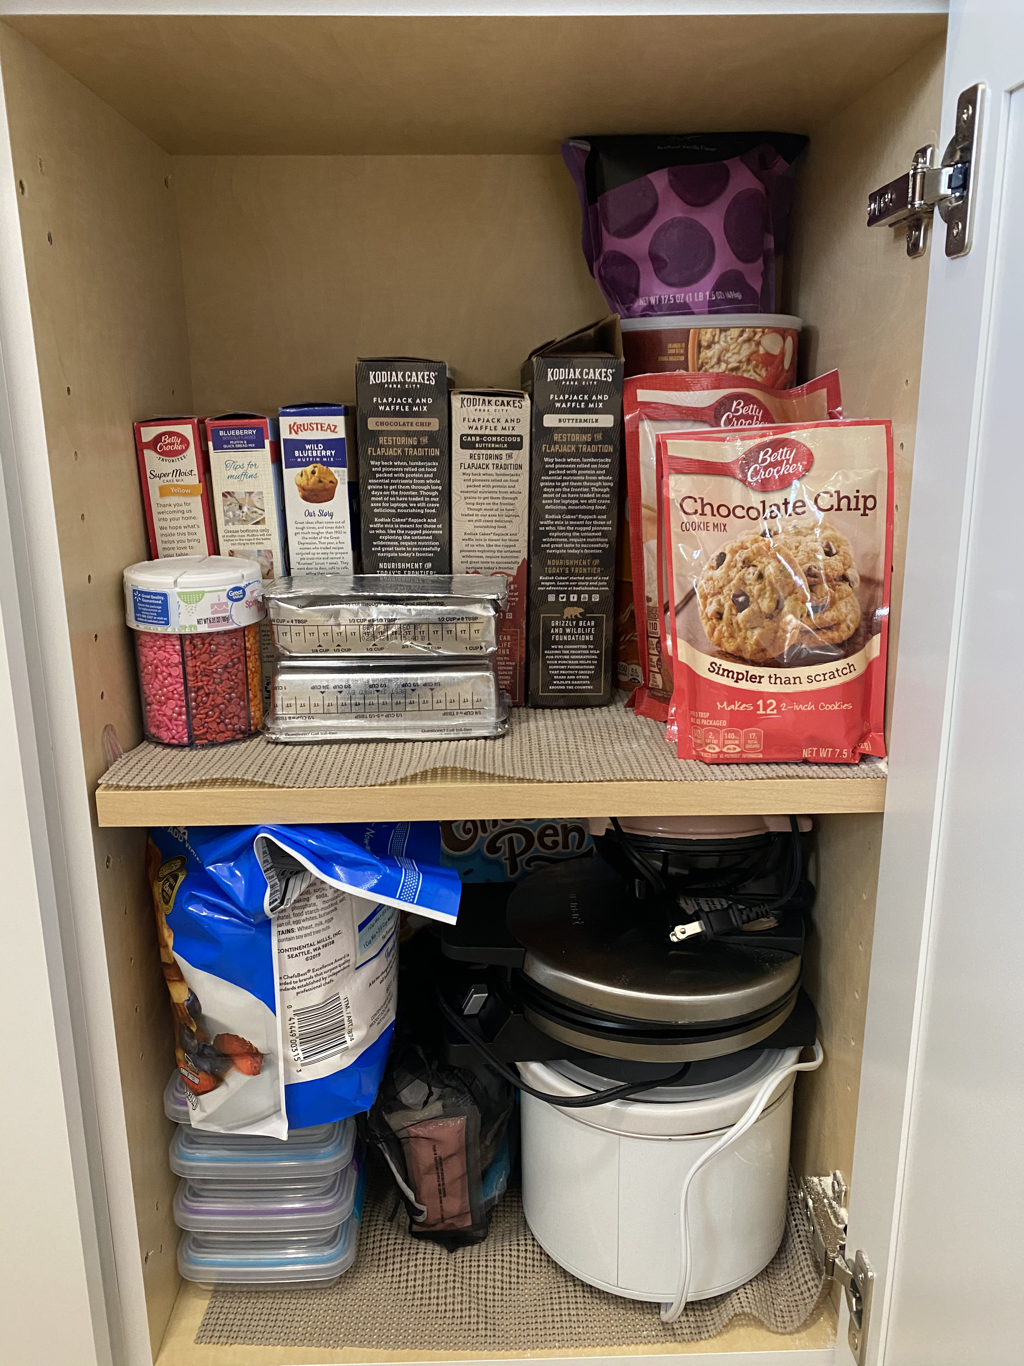 5. Toss Anything ExpiredGo through your pantry, refrigerator, makeup drawer, personal hygiene products, etc. and toss anything that is expired. There is no need to allow these items to be taking up extra space, causing more clutter, when chances are you will not use them (and should not). Expired personal products and makeup can be just as unsafe as consumables.  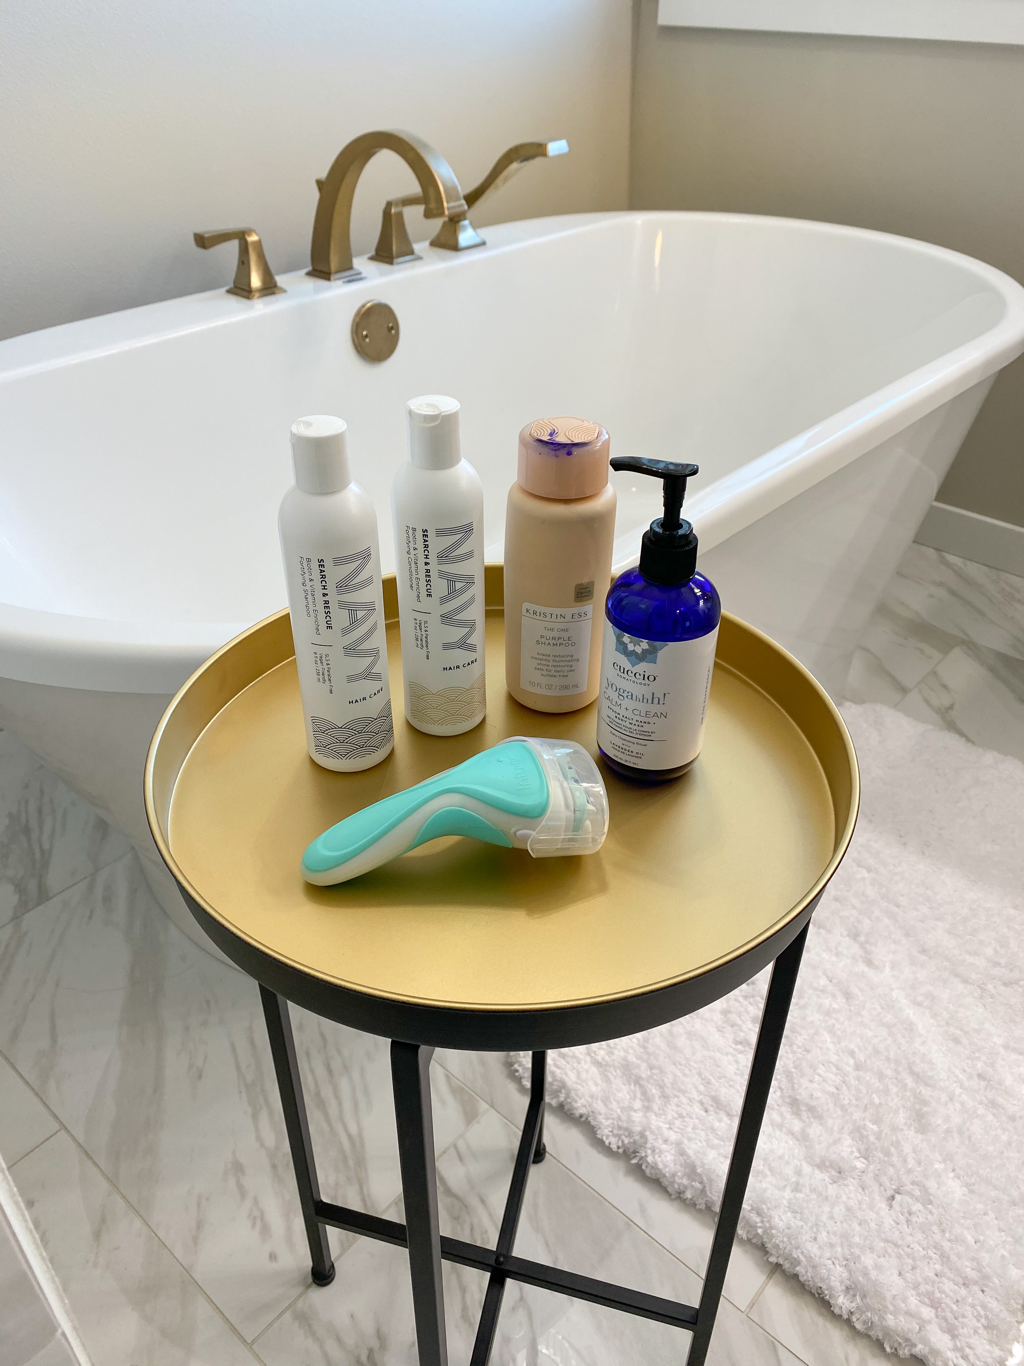 Is there anything you do on a regular (monthly, quarterly, annual, etc.) basis to keep your home in order? This post was written in partnership with The Jerry Blankers Team and is published at www.jerryblankers.com/blog. All opinions are my own. If you are in need of a realtor in Whatcom County, WA, we used them for our most recent land purchase and home sales and I highly recommend them! You can give them a call at 360-410-1297 or email [email protected] or [email protected]. Instagram: @blankersrealestate
As Christmastime and the holidays approach many of us have started shopping for gifts for friends and family and even watching the hot sales for ourselves. Whether you are searching for others or yourself, here are ten of the hottest gift items, in a range of prices, for new homeowners. 10. Salt & Pepper Mills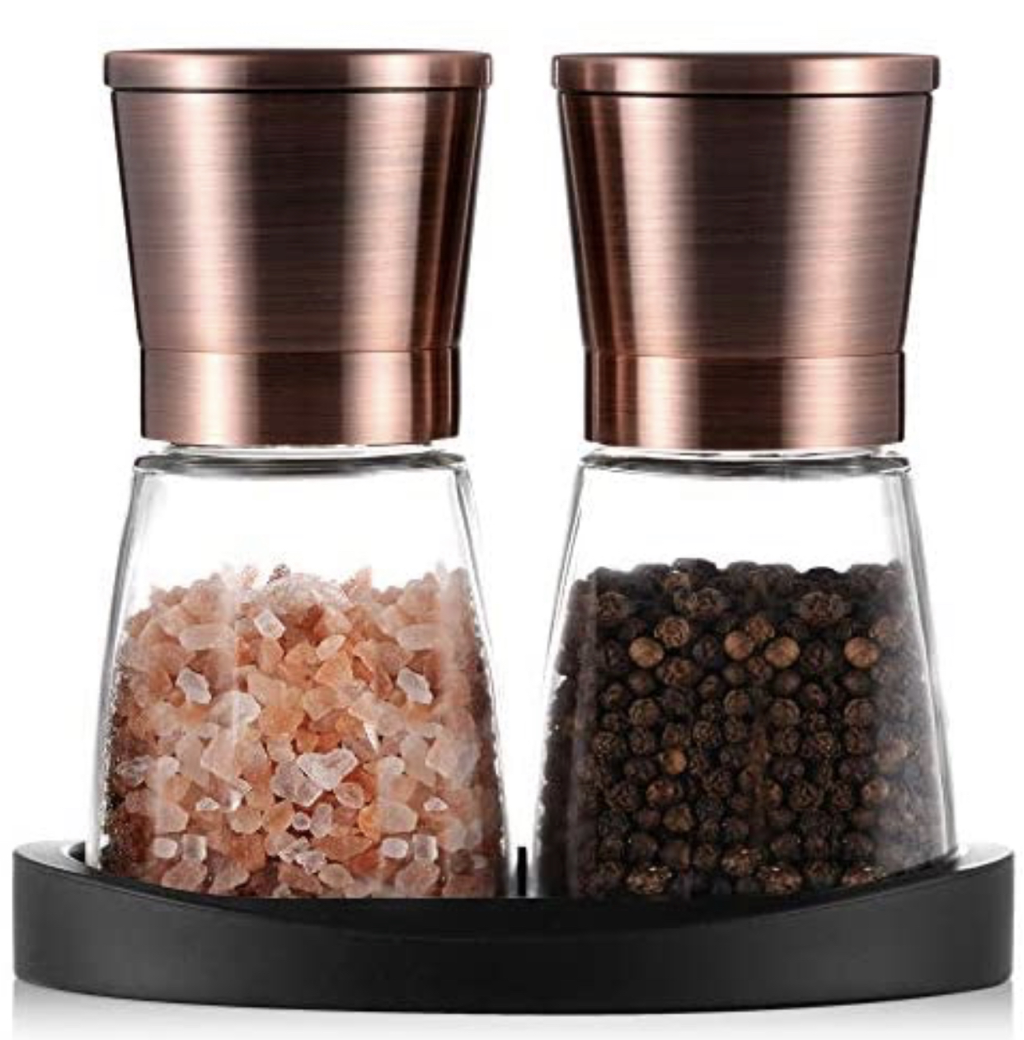 We have had this exact salt and pepper mill set for over a year and love it! It is beautiful, functional and unique; we receive many compliments on it from guests. It has an adjustable rotor allowing you to decide the coarseness of your salt, pepper or other spice. The set is under $15 making it an affordable, thoughtful gift. 9. 5’ Faux Fiddle Leaf Tree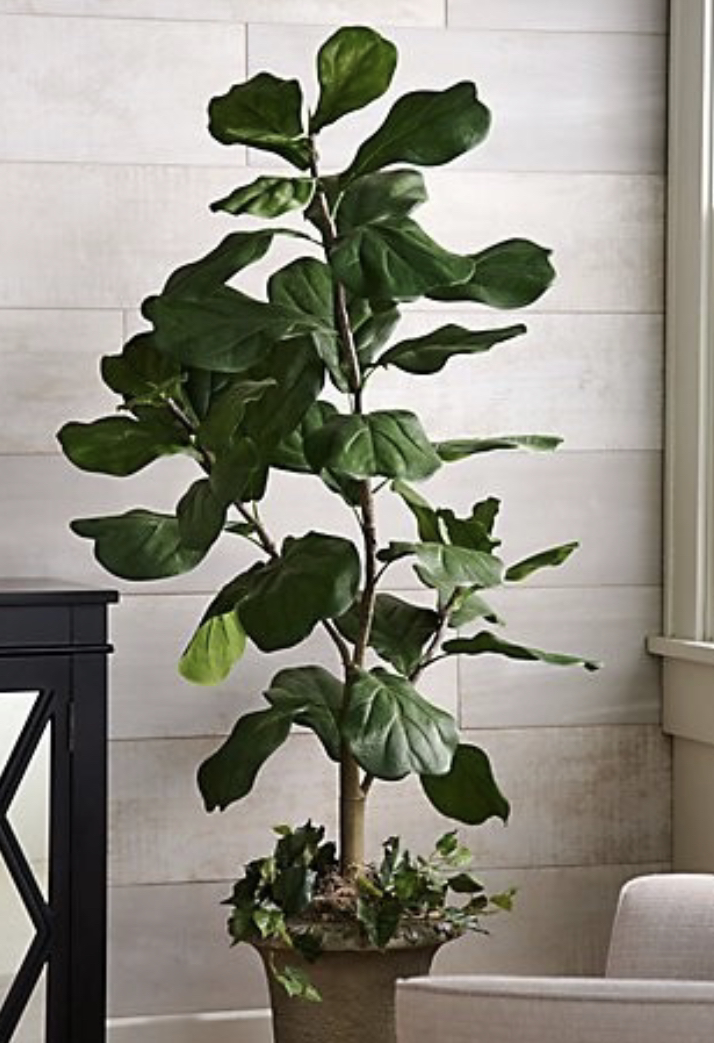 I just ordered this 5’ faux fiddle leaf tree for my master bathroom and can’t wait for it to arrive; the reviews and price are wonderful. There are so many places I could use this in my home and I’m sure many feel the same way making it a great gifting option. 8. Touchscreen Air Fryer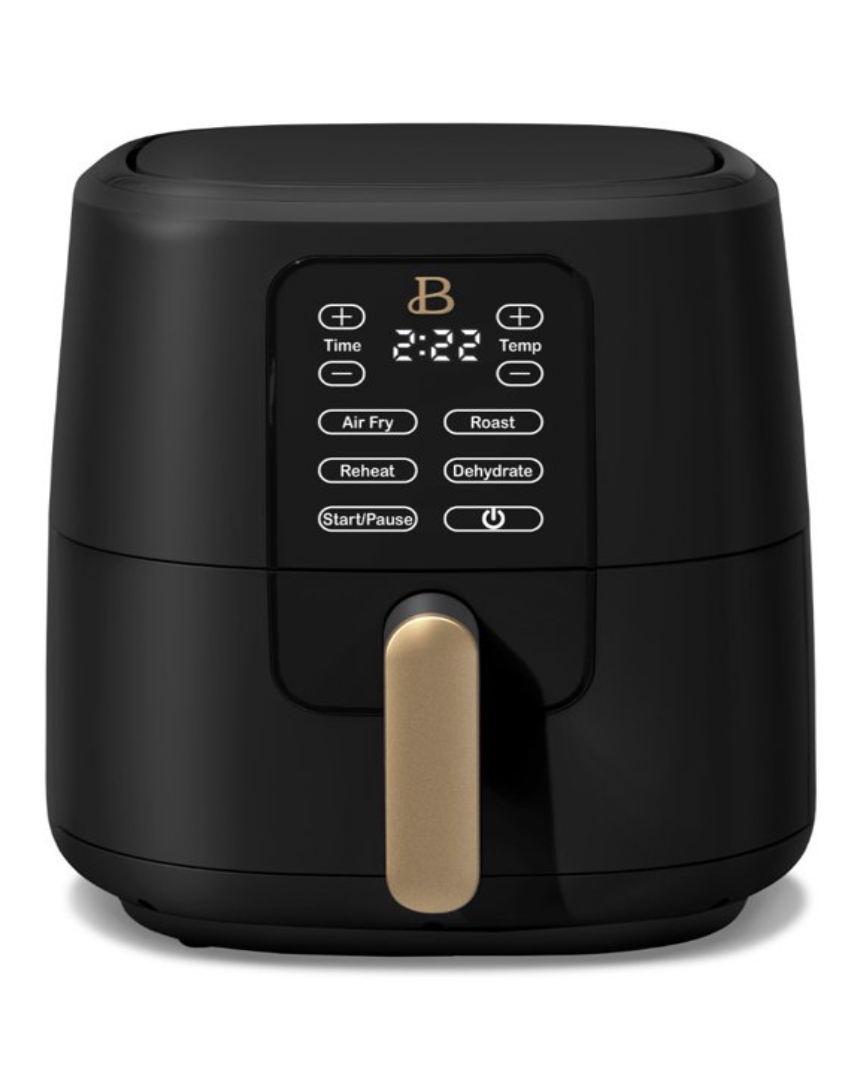 Air fryers have become increasingly popular these last few years and the new Beautiful by Drew Barrymore line at Walmart is stunning. It comes in multiple gorgeous colors and is priced affordably. In addition to the air fryers, this line includes toasters, coffee pots, electric kettles, toaster ovens, knife block sets, cookware sets, touchscreen blenders, Dutch ovens and more. 7. Leopard Throw Blanket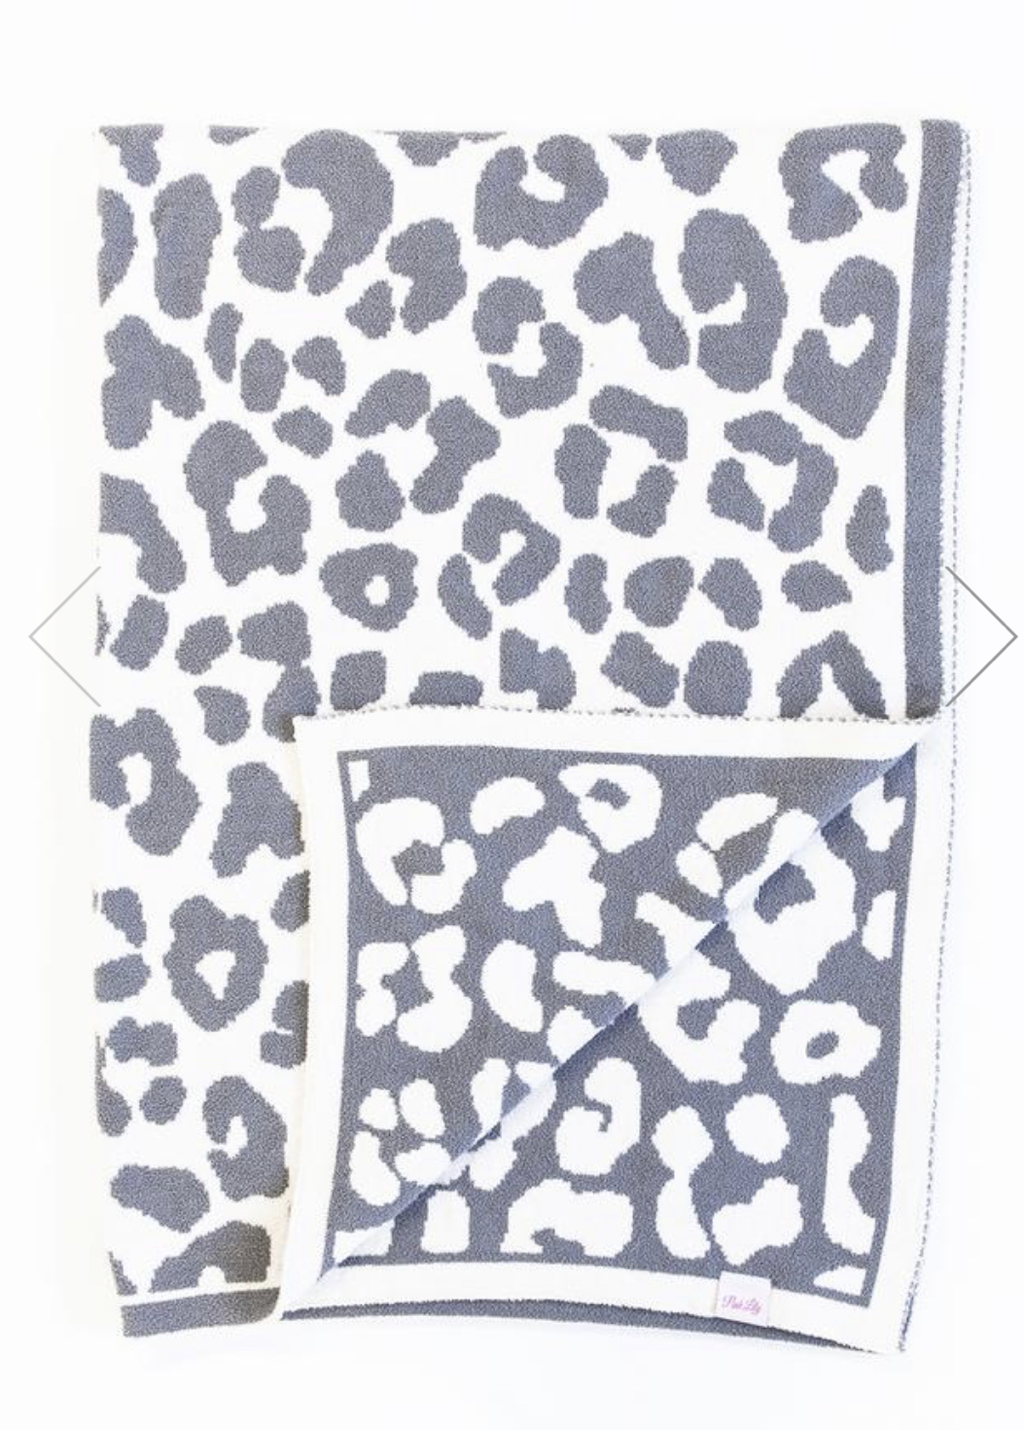 My favorite blanket! I have it in two colors. It’s super soft, beautiful, and just the right weight. A great addition to any living room or bedroom; a gift that any new homeowner is sure to love. 6. Capri Blue Jar Candle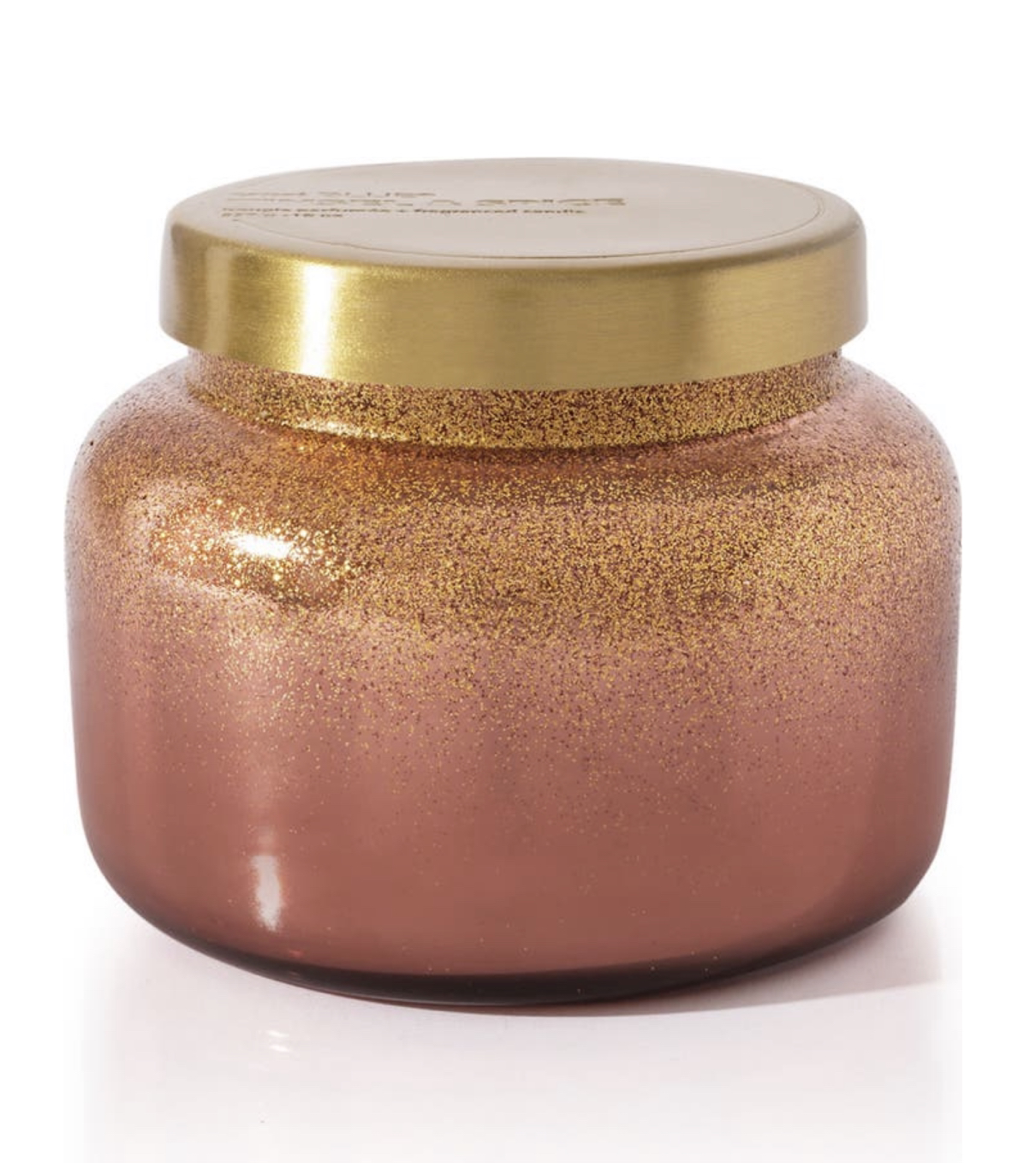 Candles are always a great choice. I love candles but don’t necessarily buy them much for myself making them such a treat when others gift them to me! This line from Nordstrom has been popular for years and is widely known for how beautiful their jars are. 5. Decorative Tray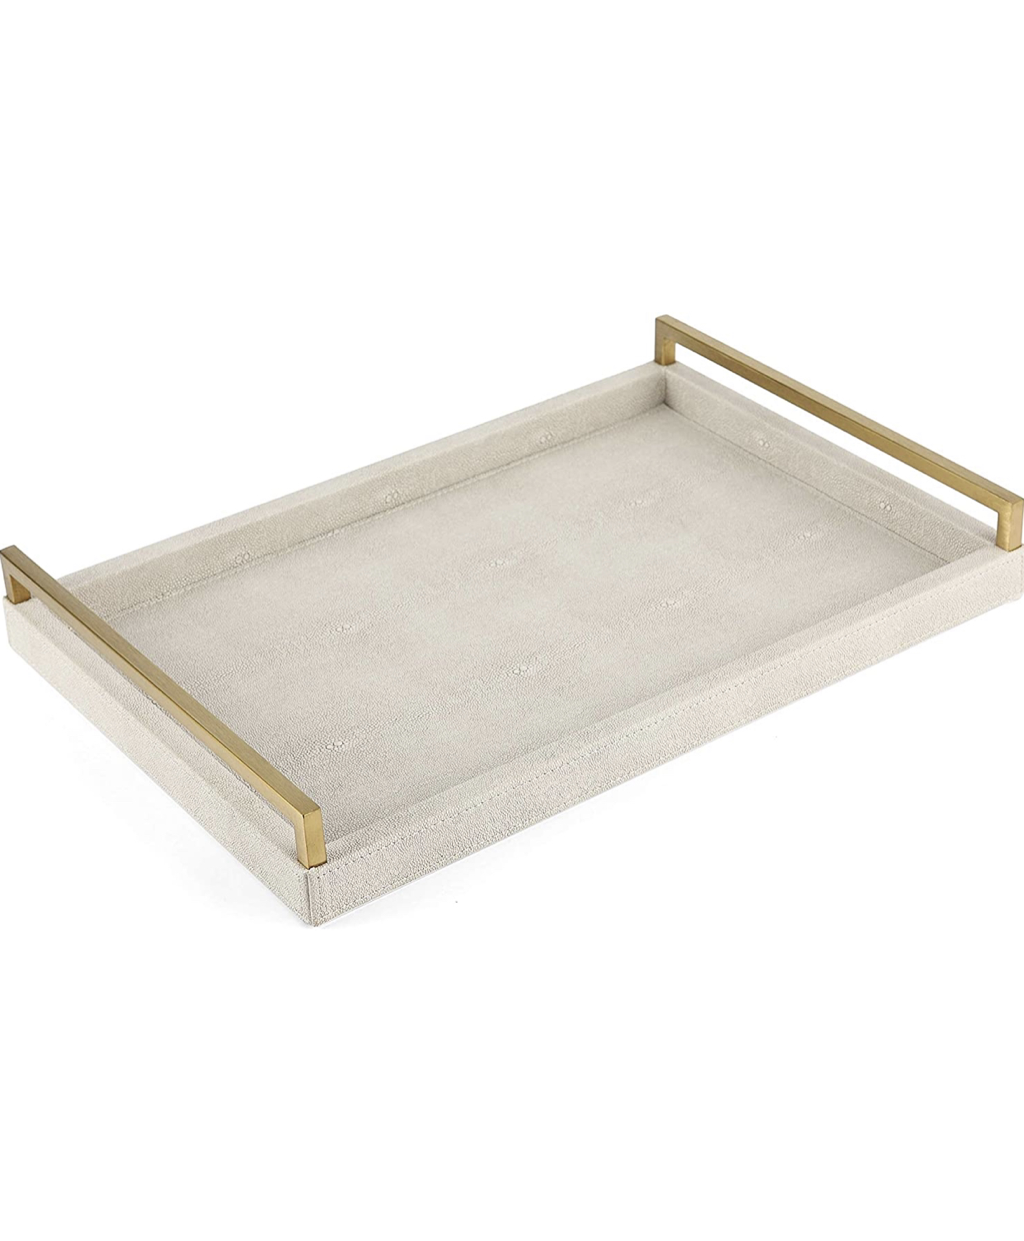 Decorative trays can be used in so many ways throughout the home; both as decor and functionally. This one comes in multiple color options. 4. Dried Floral Bouquet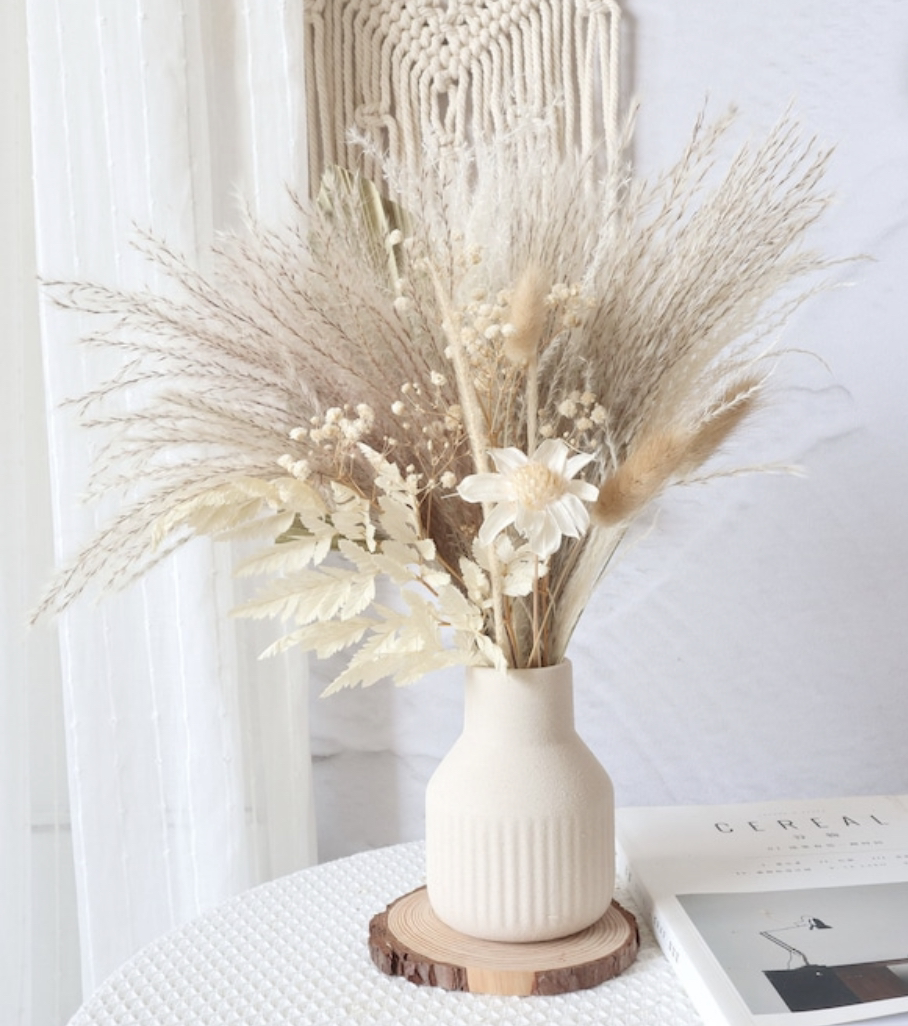 Flowers have been a popular gifting choice for years, However, most of the time they don’t last very long. Pampas grass arrangements have been trending this year; a new twist on a classic favorite bouquet and they are a permanent decor item that does not die or require any care. 3. Silicone Kitchen Utensils Set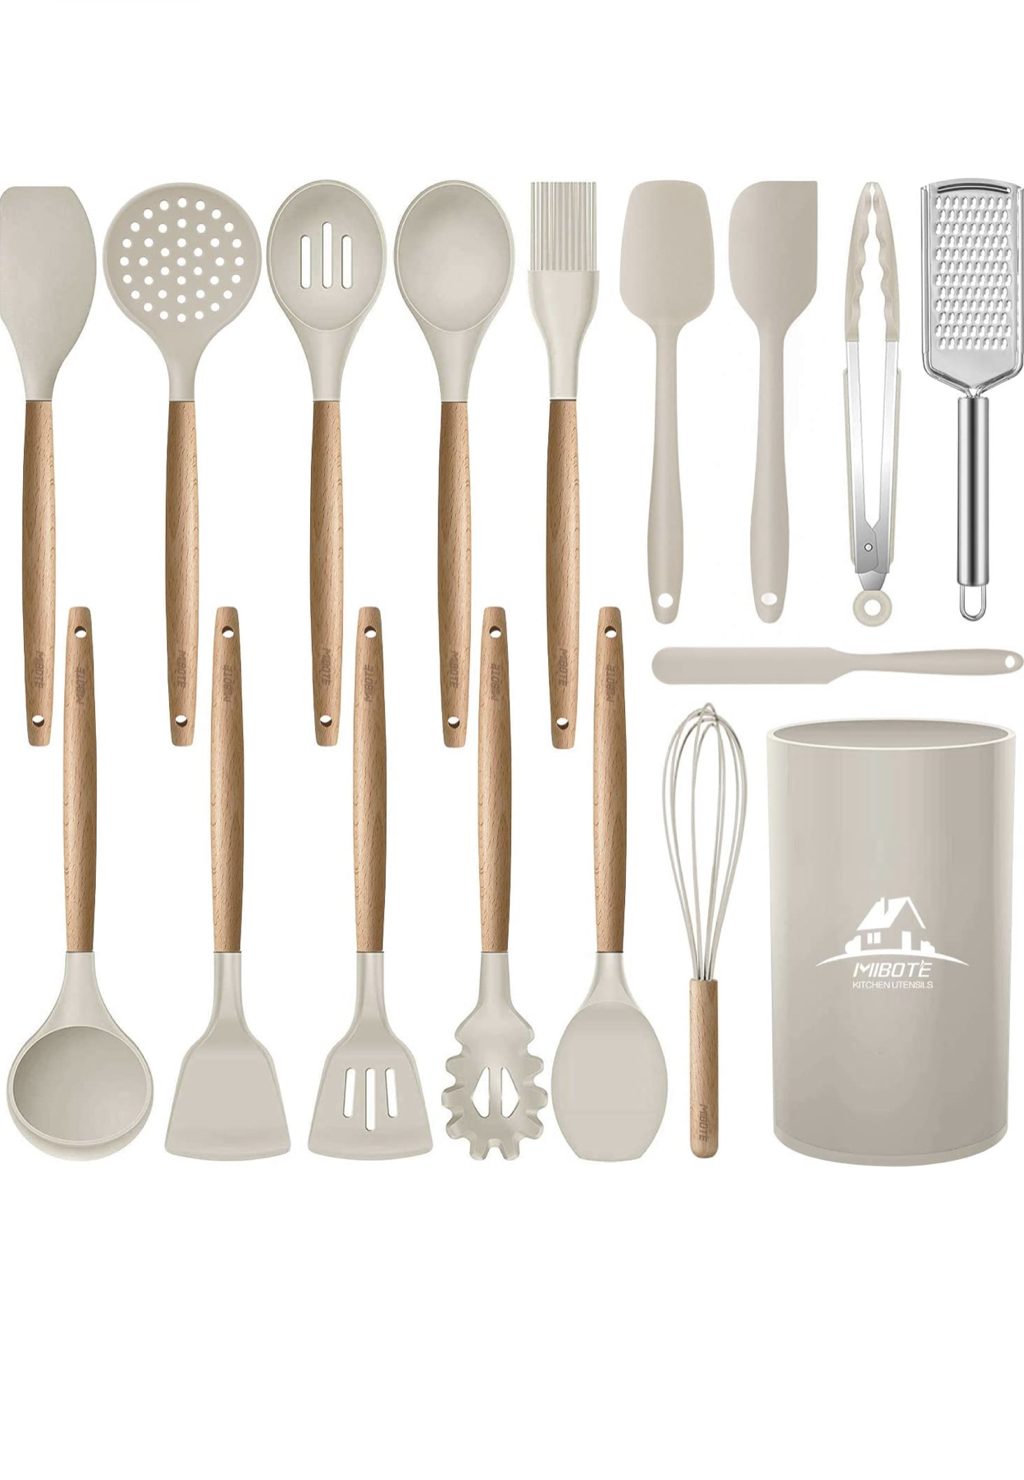 I actually received this silicone kitchen utensil set as a gift myself from my brother last year and it has held up well. It comes in quite a few color options and is a set that I love displaying on my countertops due to its aesthetically appealing design. 2. Stemless Wine Glasses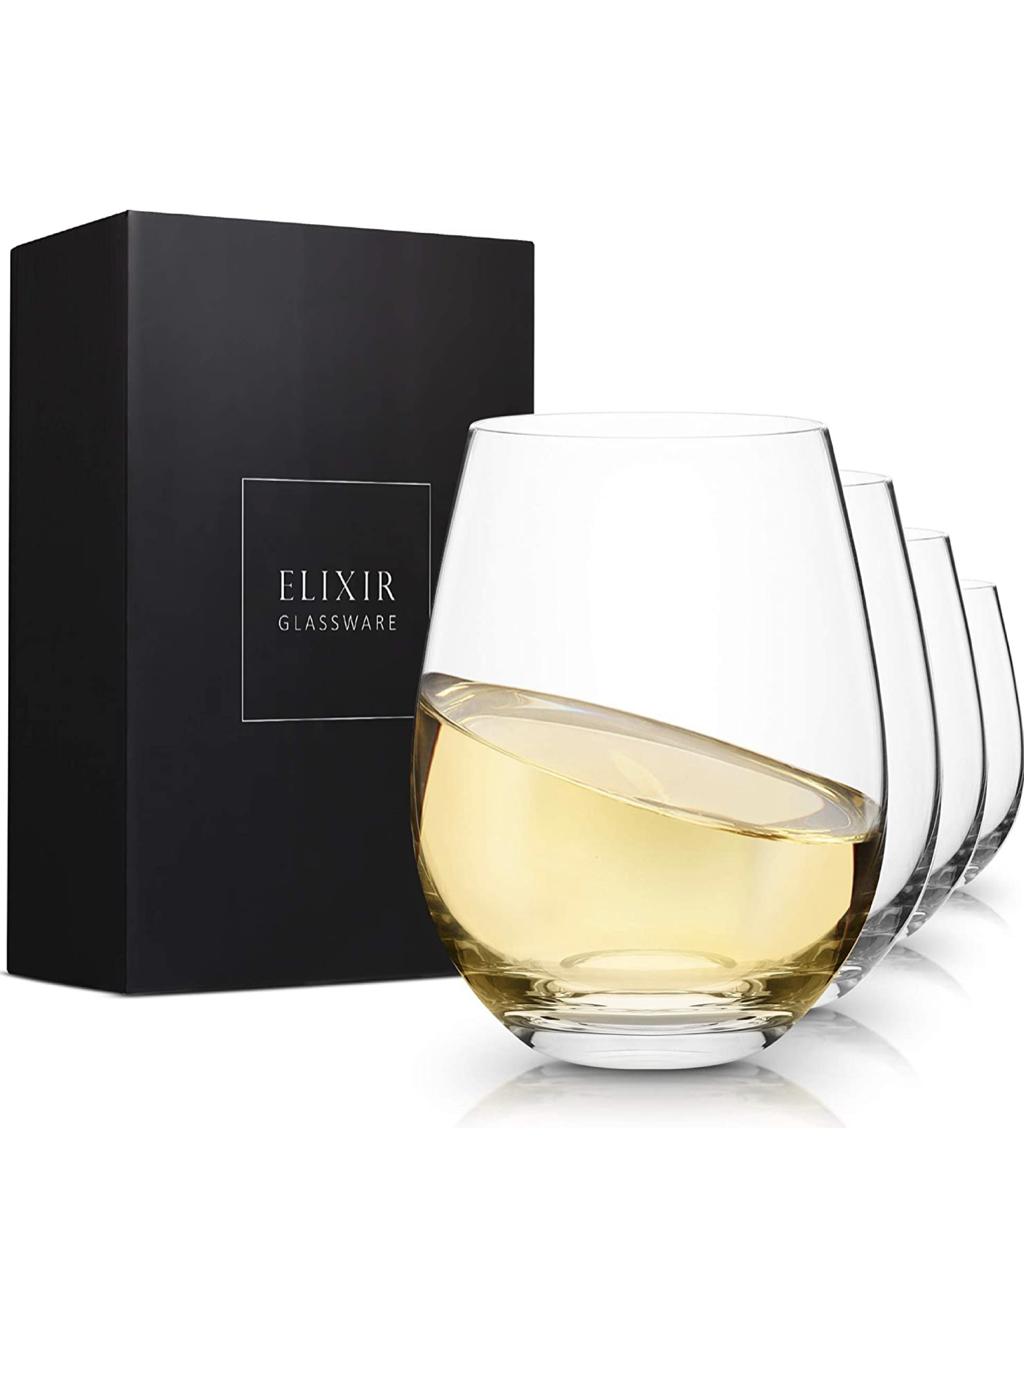 Wine glasses are always a great gift idea but stemless wine glasses are a bit less common making it a safer choice to give to a friend or family member when not knowing what they currently already own. 1. Personalized Wooden Family Name Sign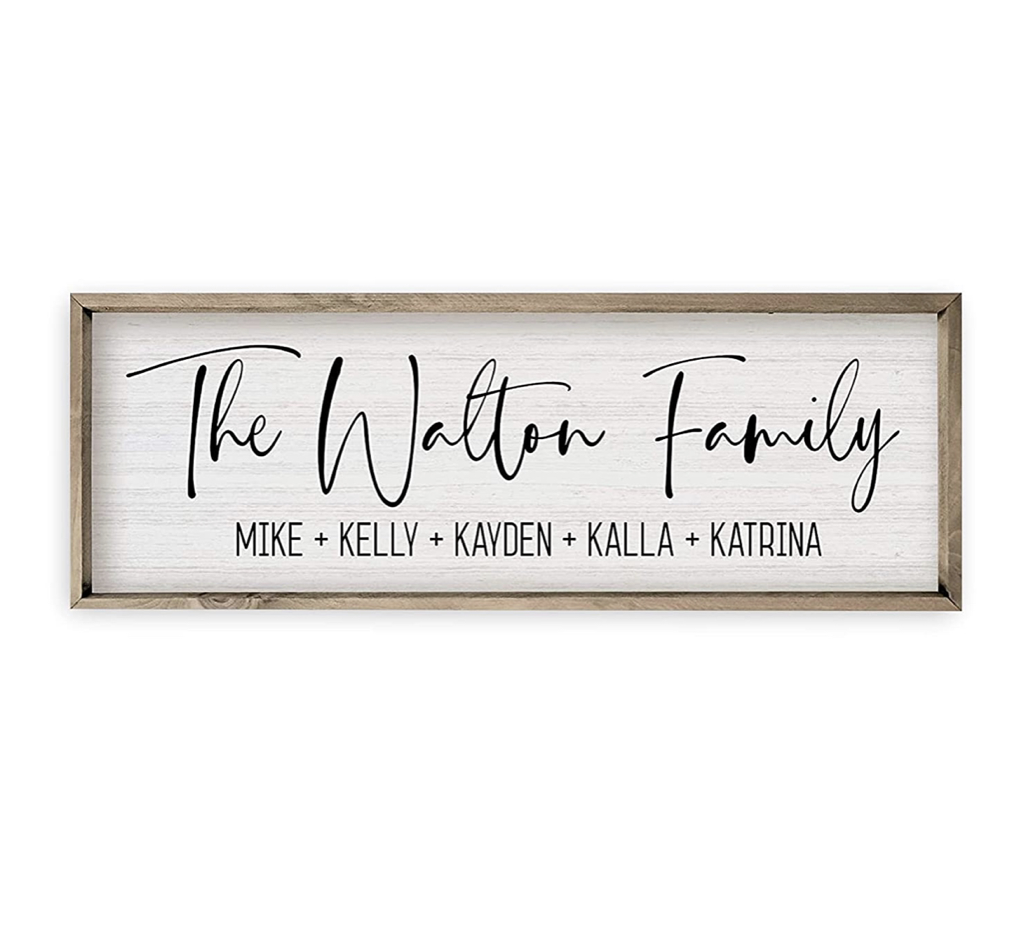 When moving into a new home it’s always fun to personalize it and make it fit your family best. I found this custom name sign on Amazon and it’s the perfect gift to warm the heart of a new homeowner! Which item is your favorite? Do you own any of them? Which will you gift to friends and family? We would love to hear your thoughts! 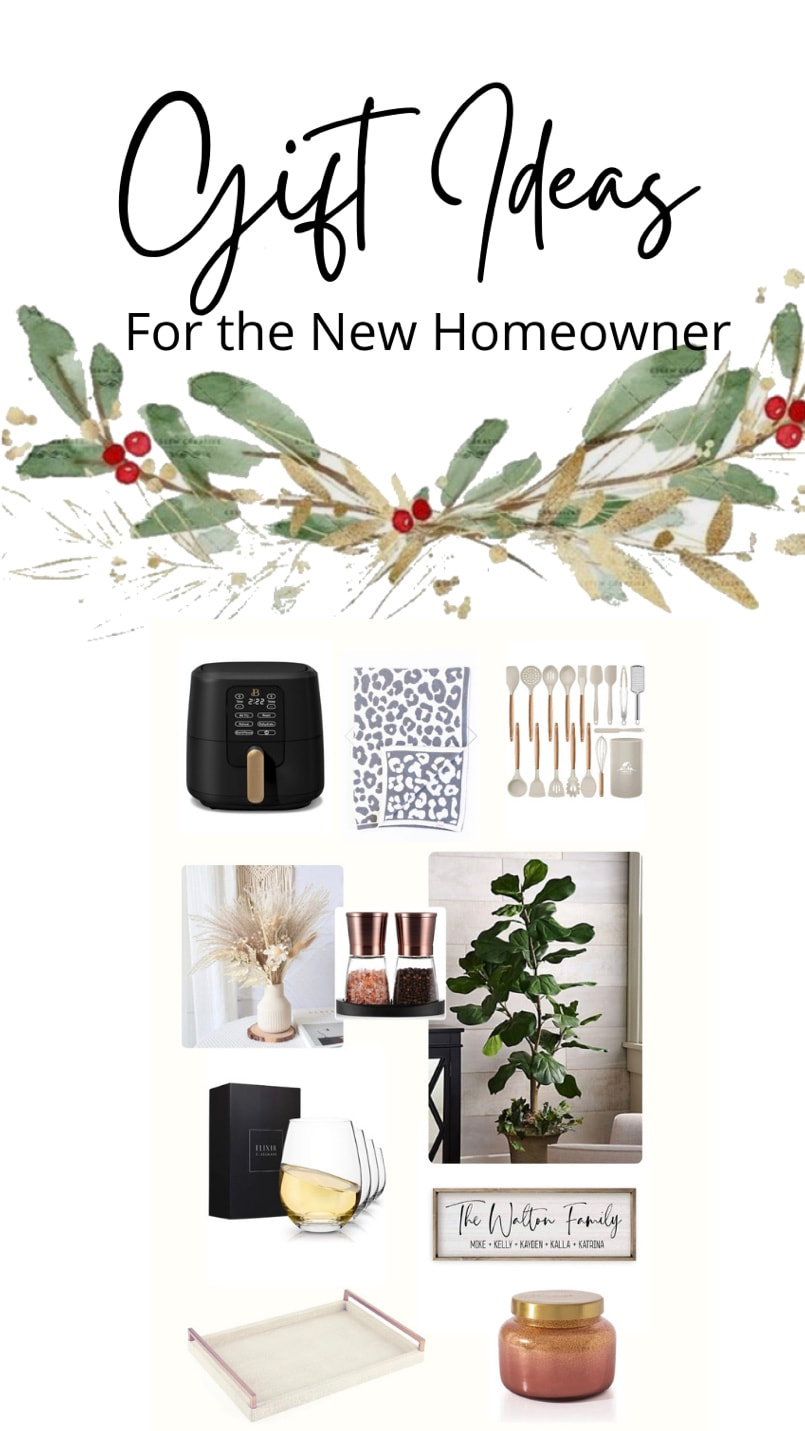 This post was written in partnership with The Jerry Blankers Team and is published at www.jerryblankers.com/blog. All opinions are my own. If you are in need of a realtor in Whatcom County, WA, we used them for our most recent land purchase and home sales and I highly recommend them! You can give them a call at 360-410-1297 or email [email protected] or [email protected]. Instagram: @blankersrealestate
We moved into our new home this past August and after having custom built our last few homes we strongly desired to change a few things in this home to make it better fitted to our needs and style. We adore our new home’s layout and location plus we have a fantastic neighborhood and knew we could make the other aesthetic changes through time. We have been so happy with the outcome of our projects thus far. We have completed almost all of them ourselves with the exception of some yard landscaping and tree removal. Our last two homes we chose white cabinets for the kitchen and I had always been so happy with them. I love the fresh, bright ambiance of it. I considered white for this home as well but the previous owners had already painted the kitchen walls white plus we changed the countertops to white so I felt white cabinets may be a bit much for this space. I knew I wanted to paint them a light color though and decided on Sherwin Williams Agreeable Gray; we love it! 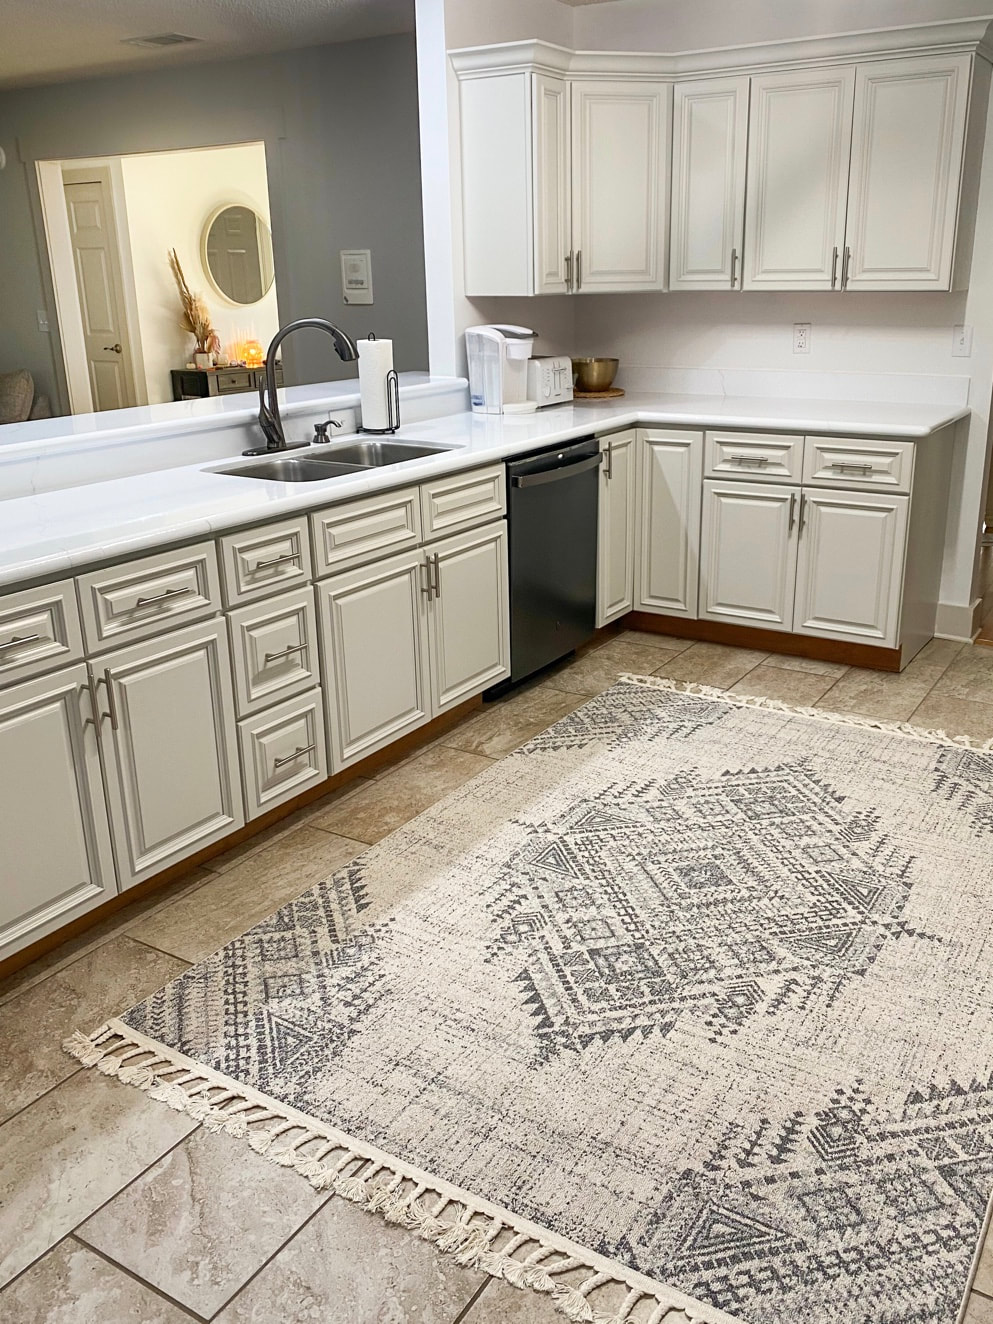 The trim throughout most of the home was already Agreeable Gray so I had been able to see how the color worked in our home and knew I would be happy with it on a larger scale. 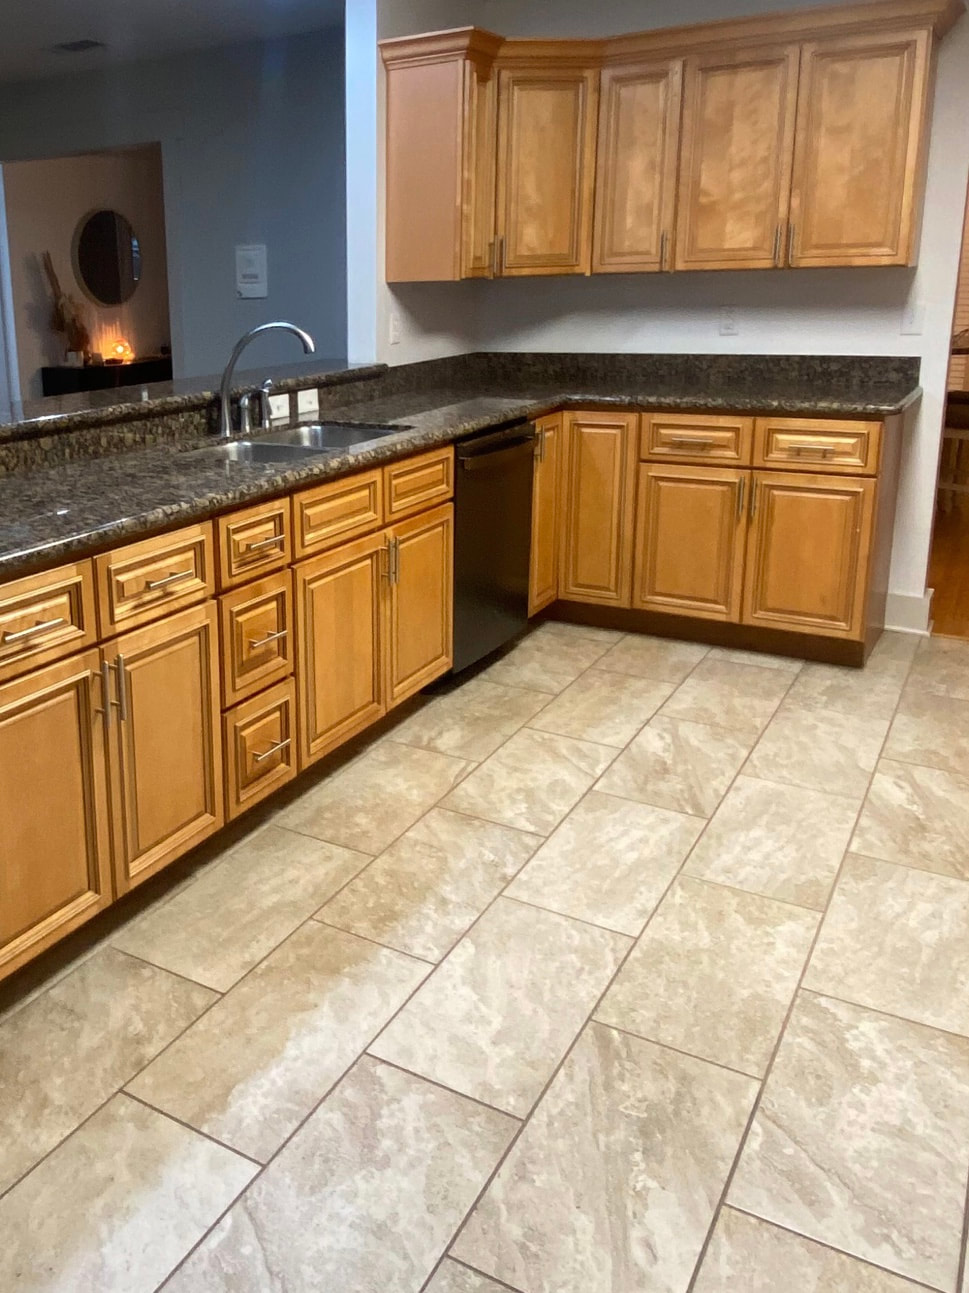 We are new to DIY projects but my husband has years of construction experience and knowledge. Though his experience is in exterior paneling and waterproofing, etc. his familiarity with the tools and processes was extremely helpful. After much research online we decided we would spray the majority of the cabinets versus hand paint it all. My husband removed all of the cabinet doors and drawers and brought them to a paint station he had set up in our garage. I stayed inside and, after taping off around the edges, hand painted the cabinet frames that remained. We numbered each cabinet door and drawer so that we wouldn’t have any issues remembering which was which upon completion and removed all hardware prior to painting. 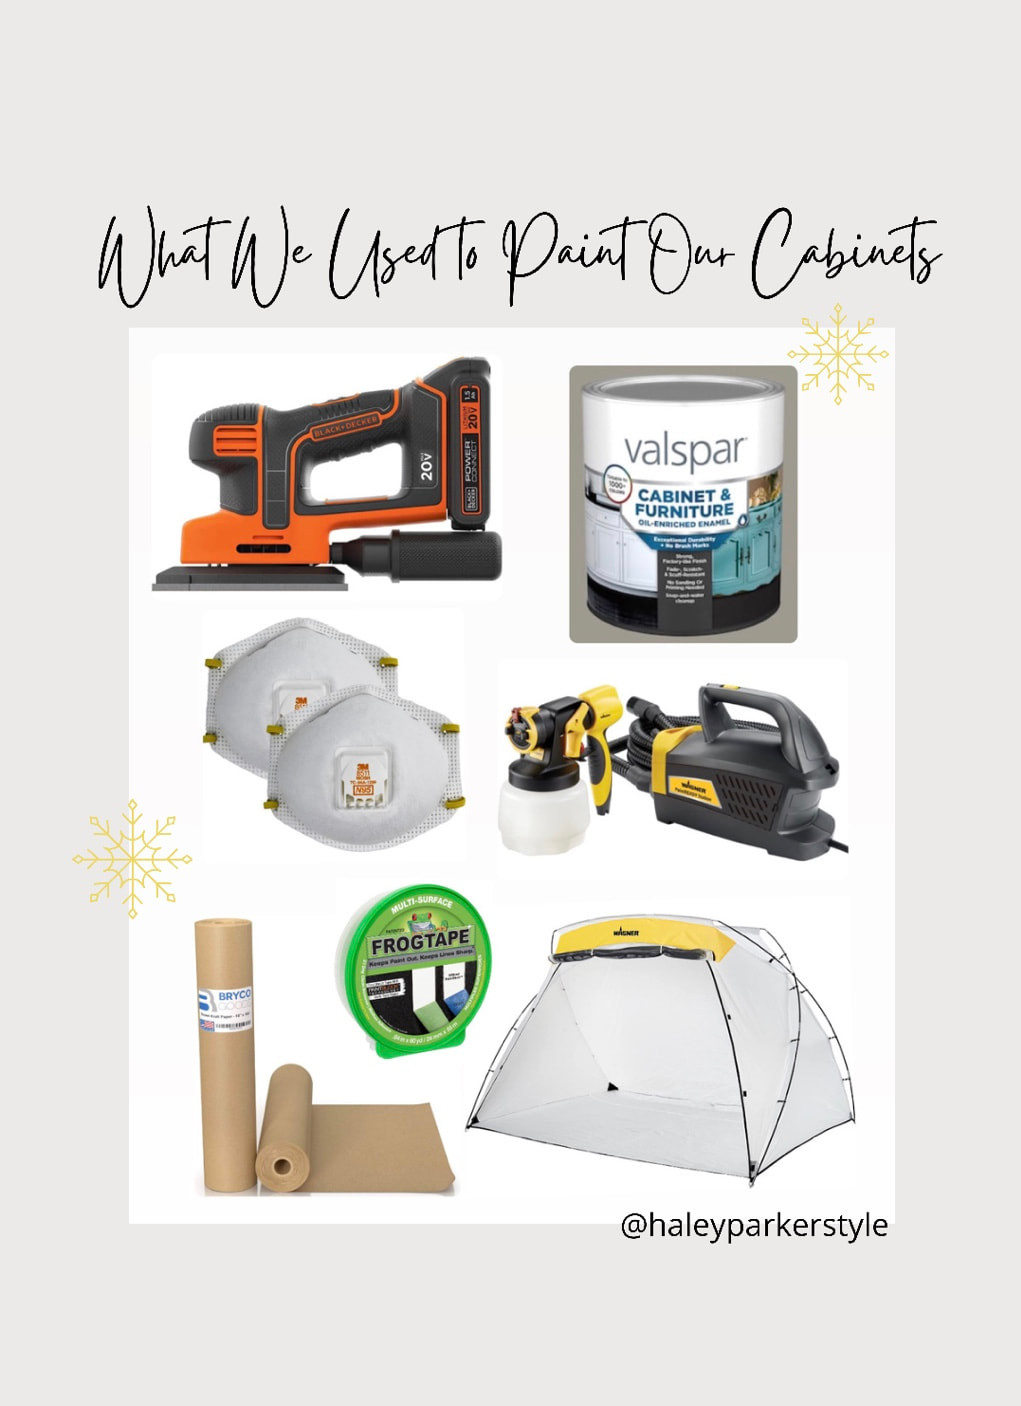 Here are the supplies we purchased to paint our kitchen cabinets (above). I’ve linked them all here. The entire process took us about 4-5 days as we still had regular life to attend to but it seemed to go by quickly! We did lightly sand the cabinets prior to painting though this particular paint states it isn’t necessary. I’ll go over our tips and what we wish we had known prior to this project.  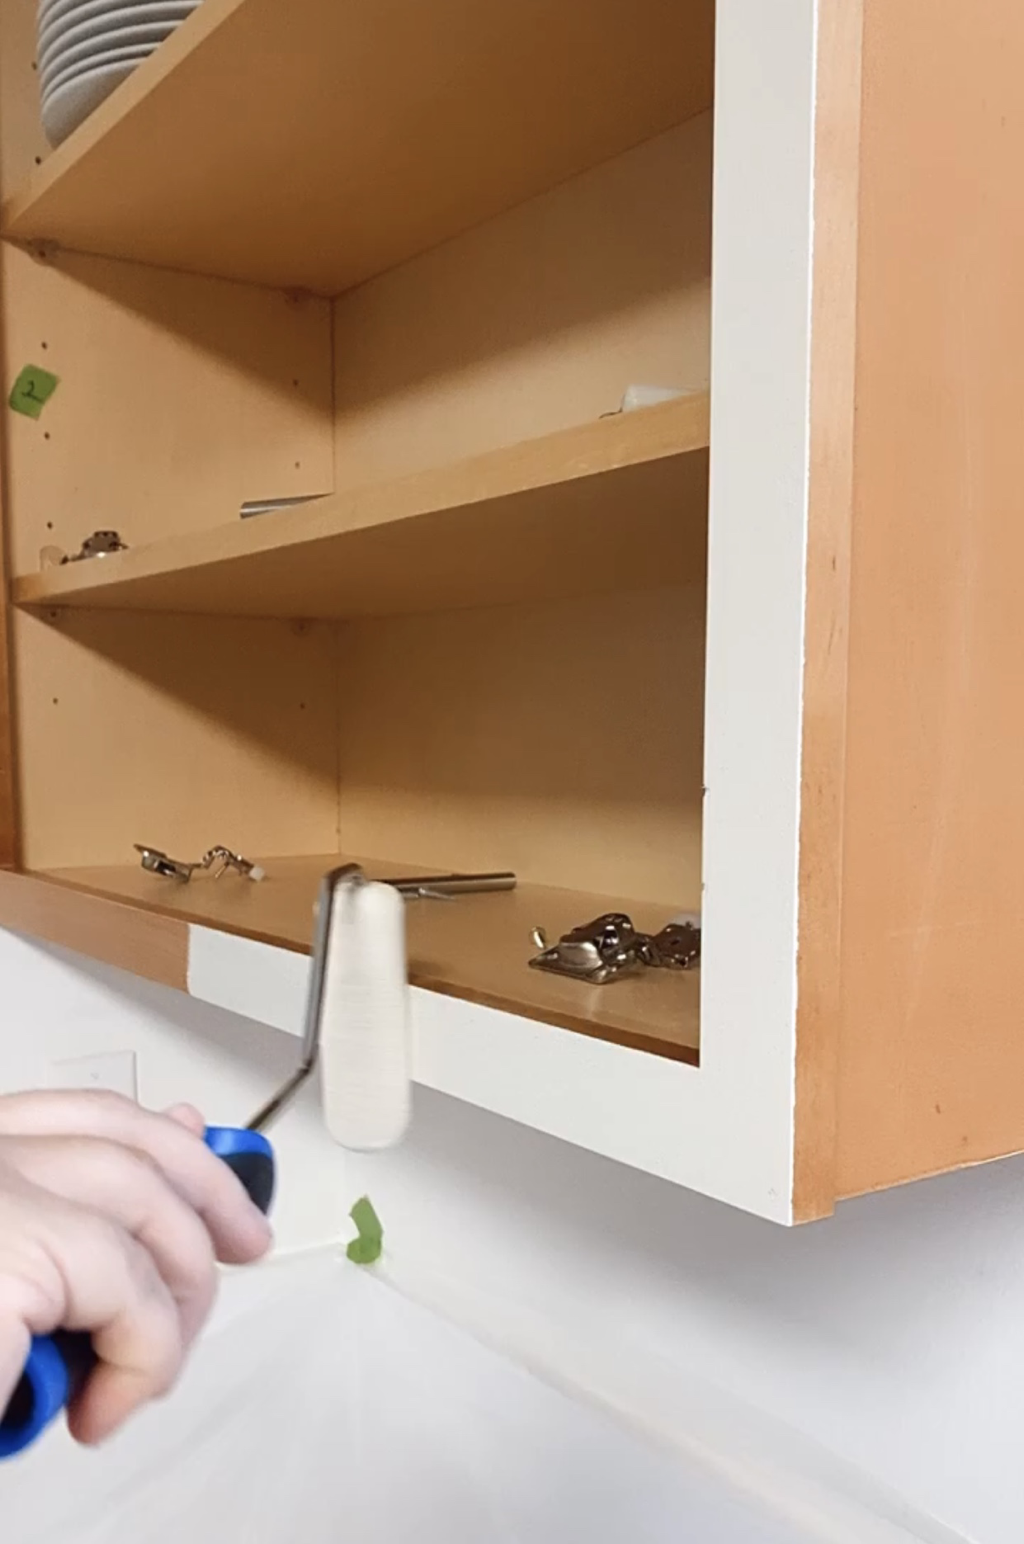 Our Biggest Tips for Painting Your Cabinets•Make sure your paint station for spraying (we set ours up in the garage) is clean and free of debris in the surrounding area. The sprayer gun releases air while in use and you want to ensure nothing blows onto your freshly painted cabinets as they dry. •Take apart and rinse the spray gun with water between coats. •Number the cabinet doors and drawers. You may think it’s easy to remember what goes where but it will save you so much time and frustration knowing for sure. •We did two coats of paint and recommend waiting at least an hour between coats to let the first coat dry. •A lazy Susan rotating swivel such a this will come in handy when spraying the cabinet drawers. Set the bottom (back) of the drawer on the swivel and push it to easily spin while spraying. 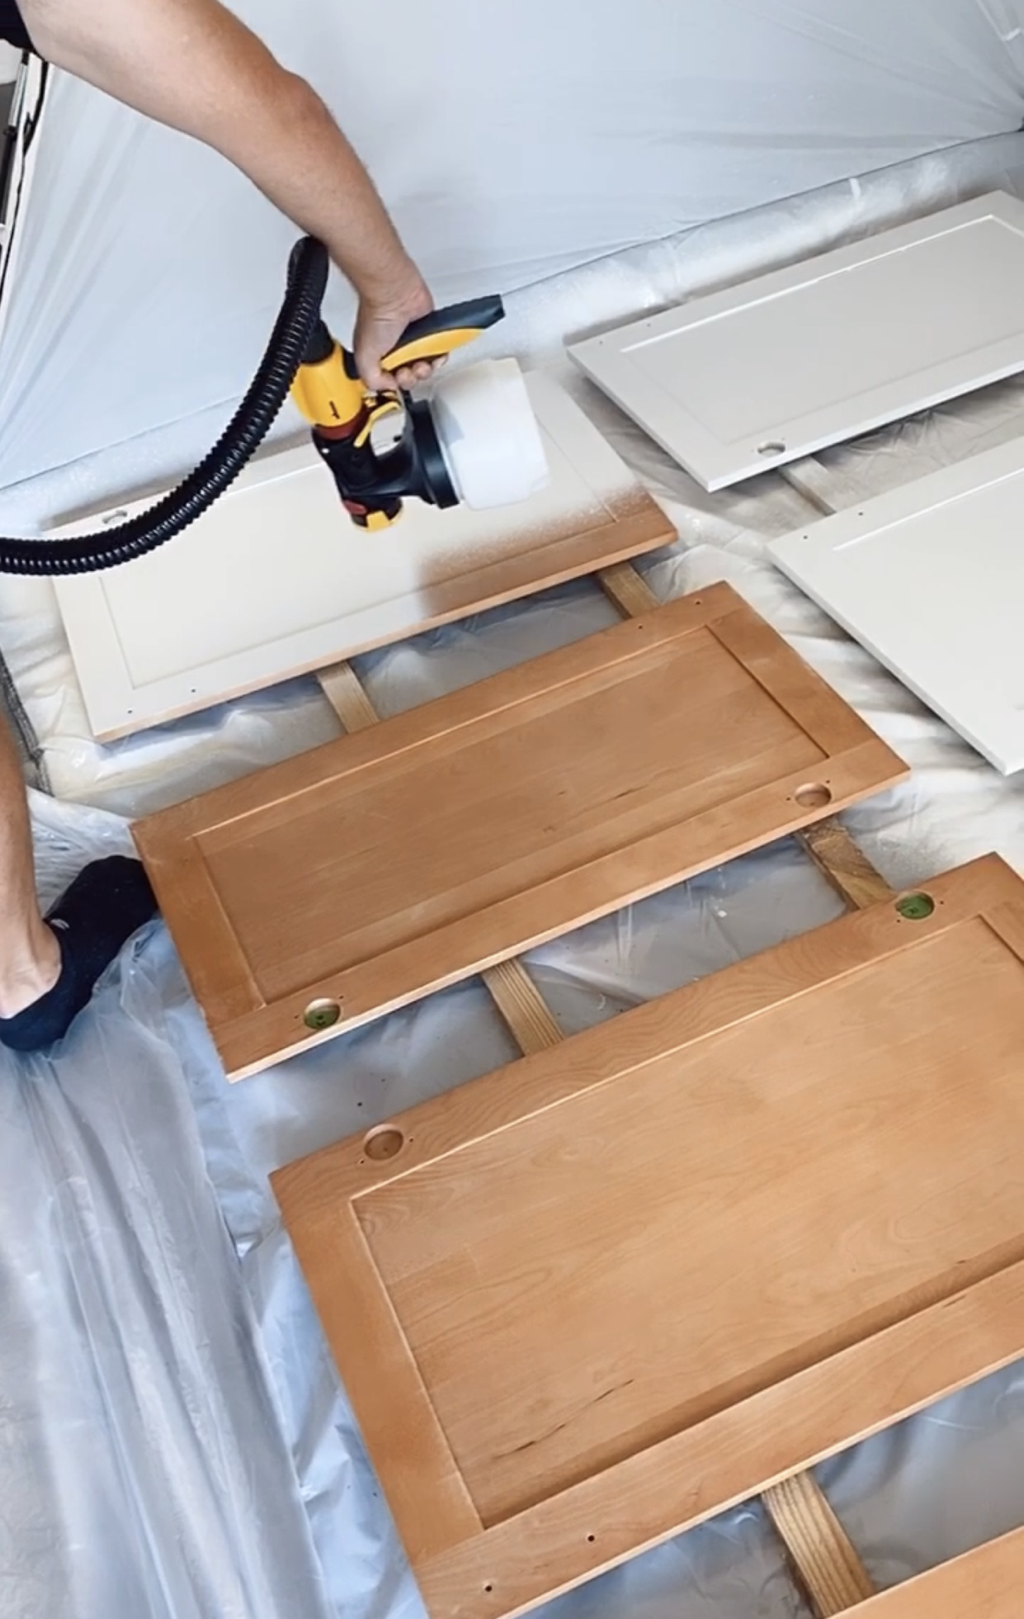 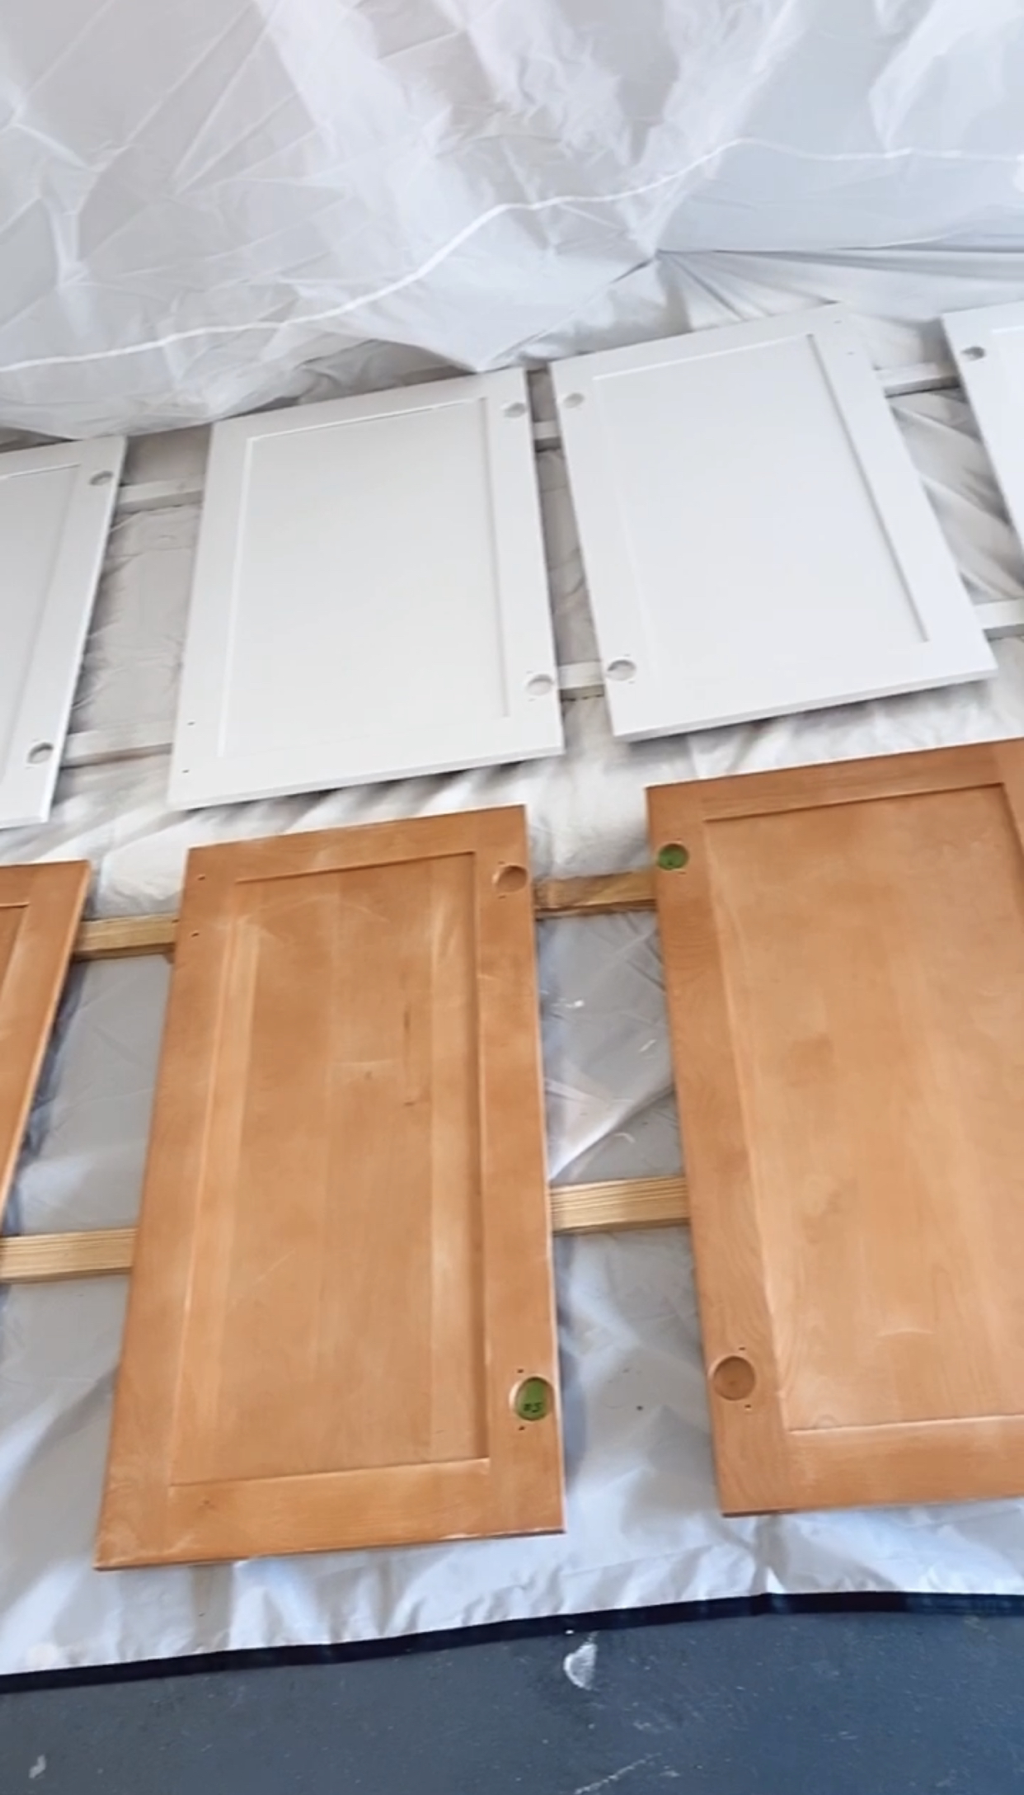 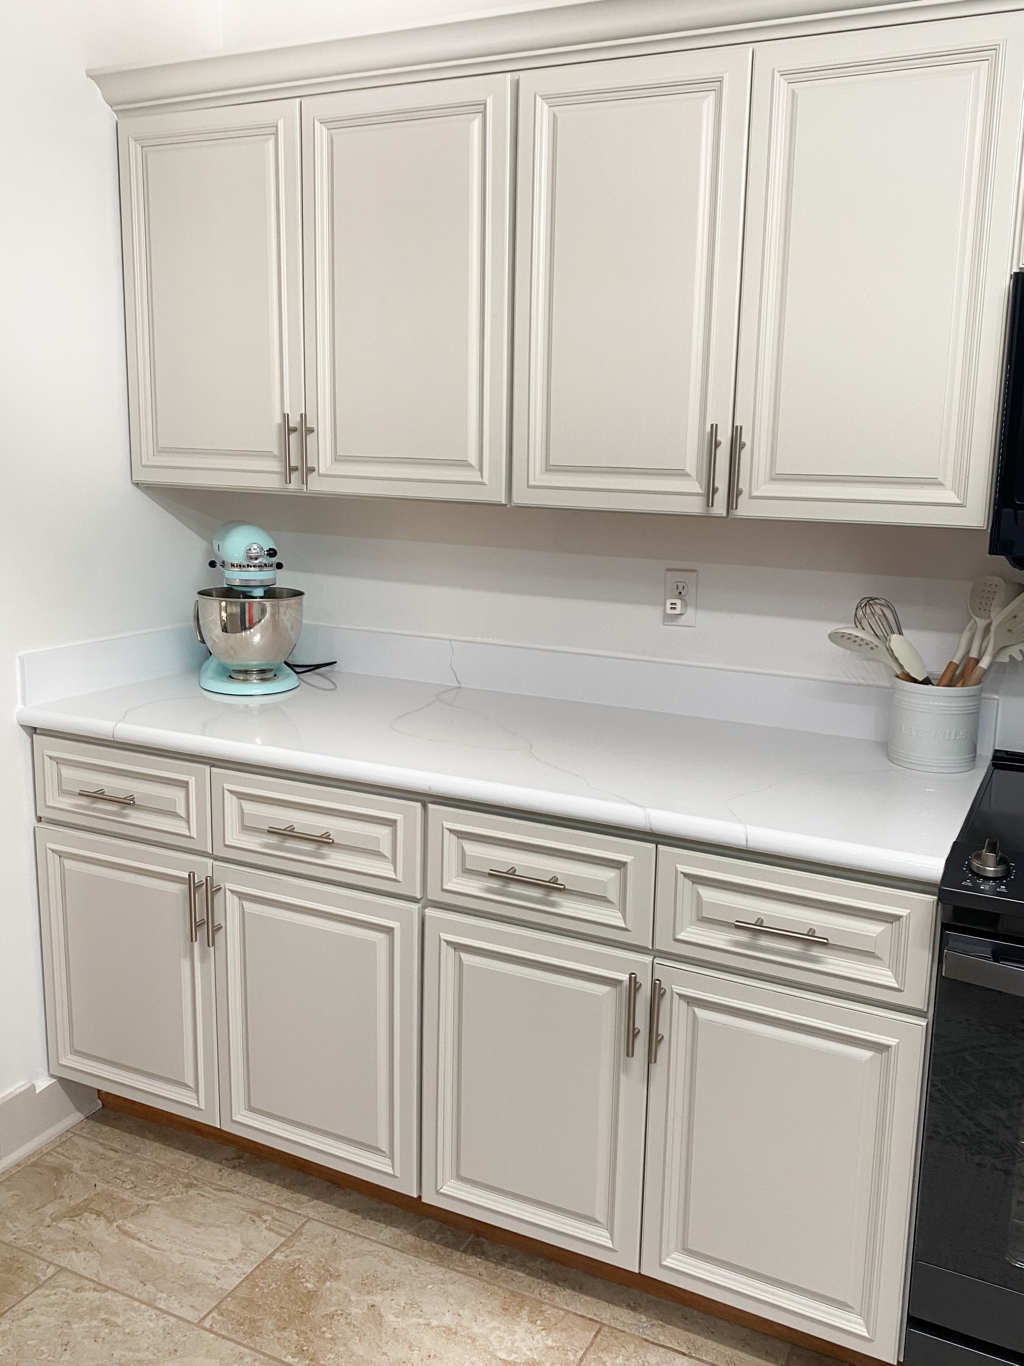 After allowing adequate time to dry, we put the cabinet doors and drawers back in place. We kept them open for the first week after to allow the paint to fully cure and dry then added cabinet bumpers to the interior corners. Have you painted cabinets before? We would love to hear your tips in the comments! This post was written in partnership with The Jerry Blankers Team and is published at www.jerryblankers.com/blog. All opinions are my own. If you are in need of a realtor in Whatcom County, WA, we used them for our most recent land purchase and home sales and I highly recommend them! You can give them a call at 360-410-1297 or email [email protected] or [email protected]. Instagram: @blankersrealestate
We recently purchased a new to us home, and although there are many things we love about the home, the kitchen wasn’t quite our style. In addition to that, the kitchen color scheme didn’t flow well with the rest of the home. The previous owners had painted most of the interior white and light gray, very light and airy colors, while the kitchen remained very dark and mostly brown. When we put in our offer, my husband and I had right away talked about changing the kitchen and upon moving in had a company over to discuss replacing the countertops. Having built a few custom homes we had an idea on what the price would be for our space and after being given a quote and determining other changes we wanted to make throughout our home, we decided it wasn’t an area we wanted to allocate that much money to at the moment. I came across multiple video reviews on TikTok and Instagram of others in a similar position that were using a countertop marble kit to change their countertops for a small fraction of the cost of replacing. At this point I knew we would be replacing within the next few years anyway so figured we had nothing to lose, and potentially a whole lot to gain, by trying it. 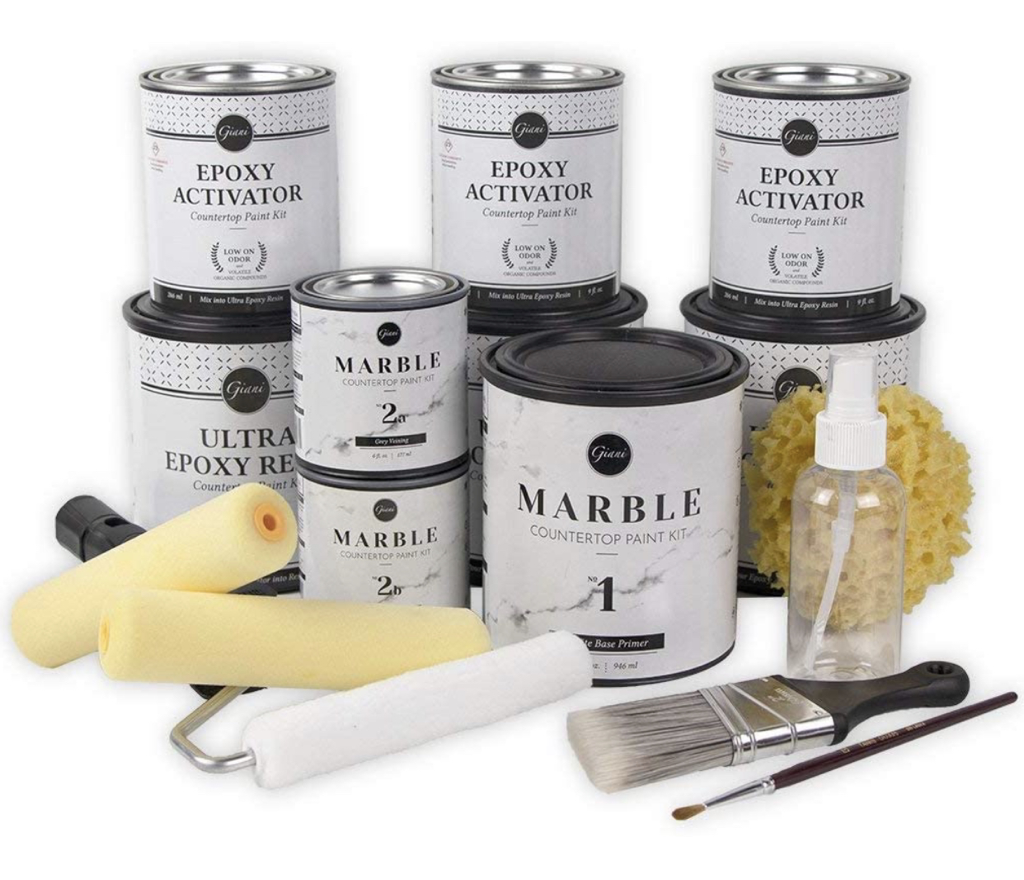 After plenty of research and reading every review I could find, we decided to go for it! This is the kit I used. It was about $170 and I ordered it on Amazon. Due to the amount of space we were covering and that our previous counters were very dark, I ended up ordering another can of the first step “#1” (about $30) to ensure full coverage. 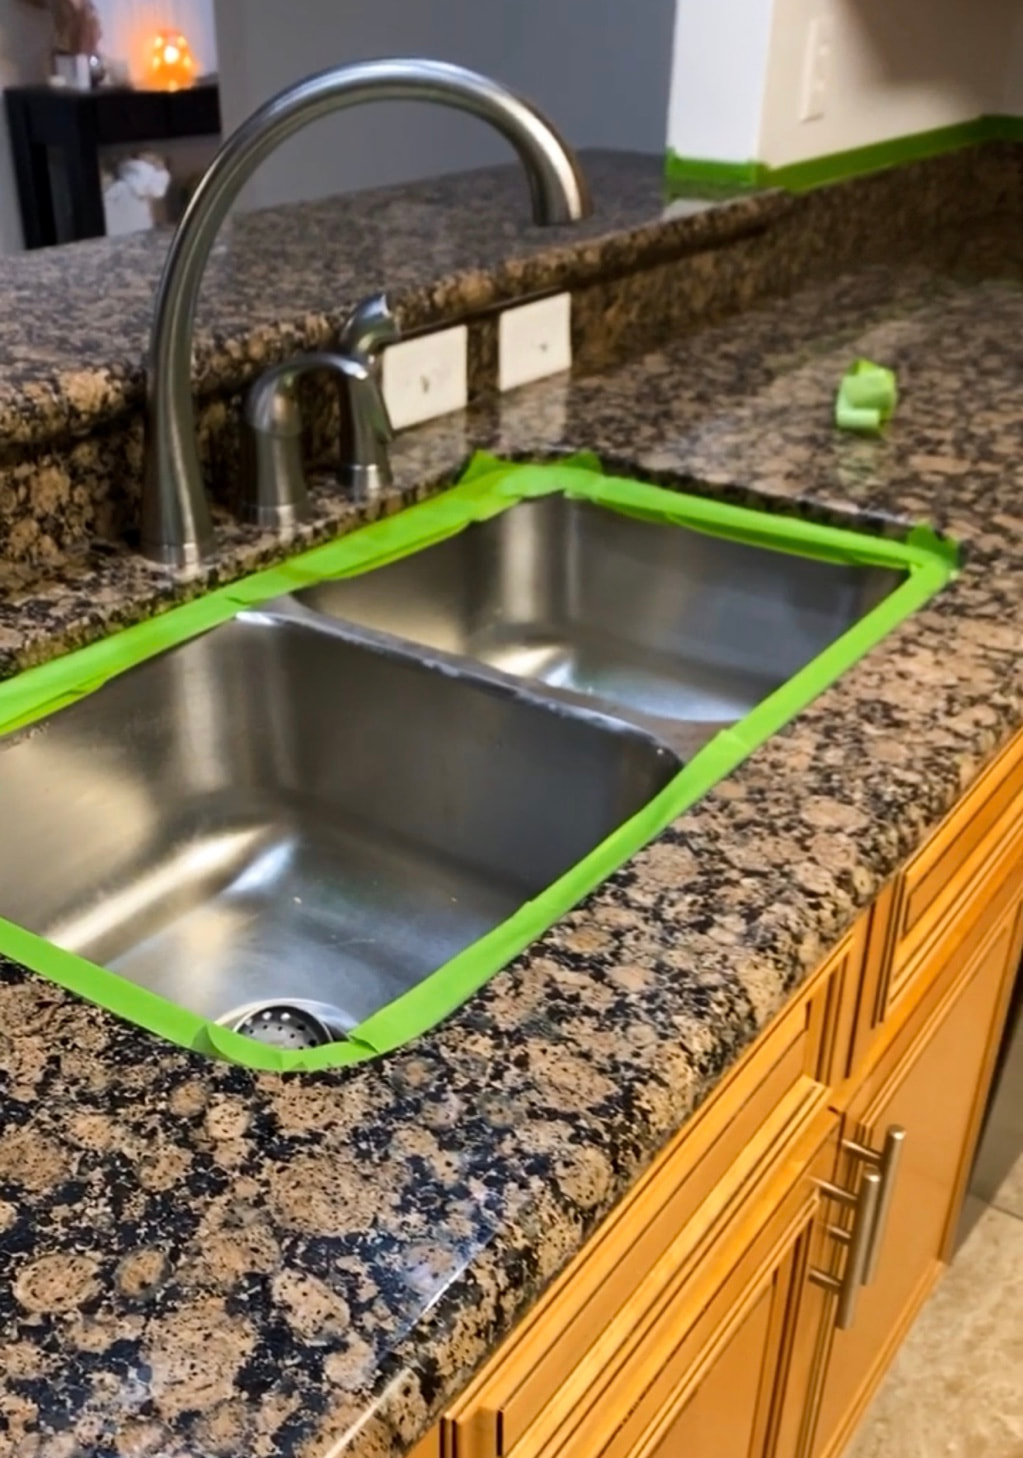 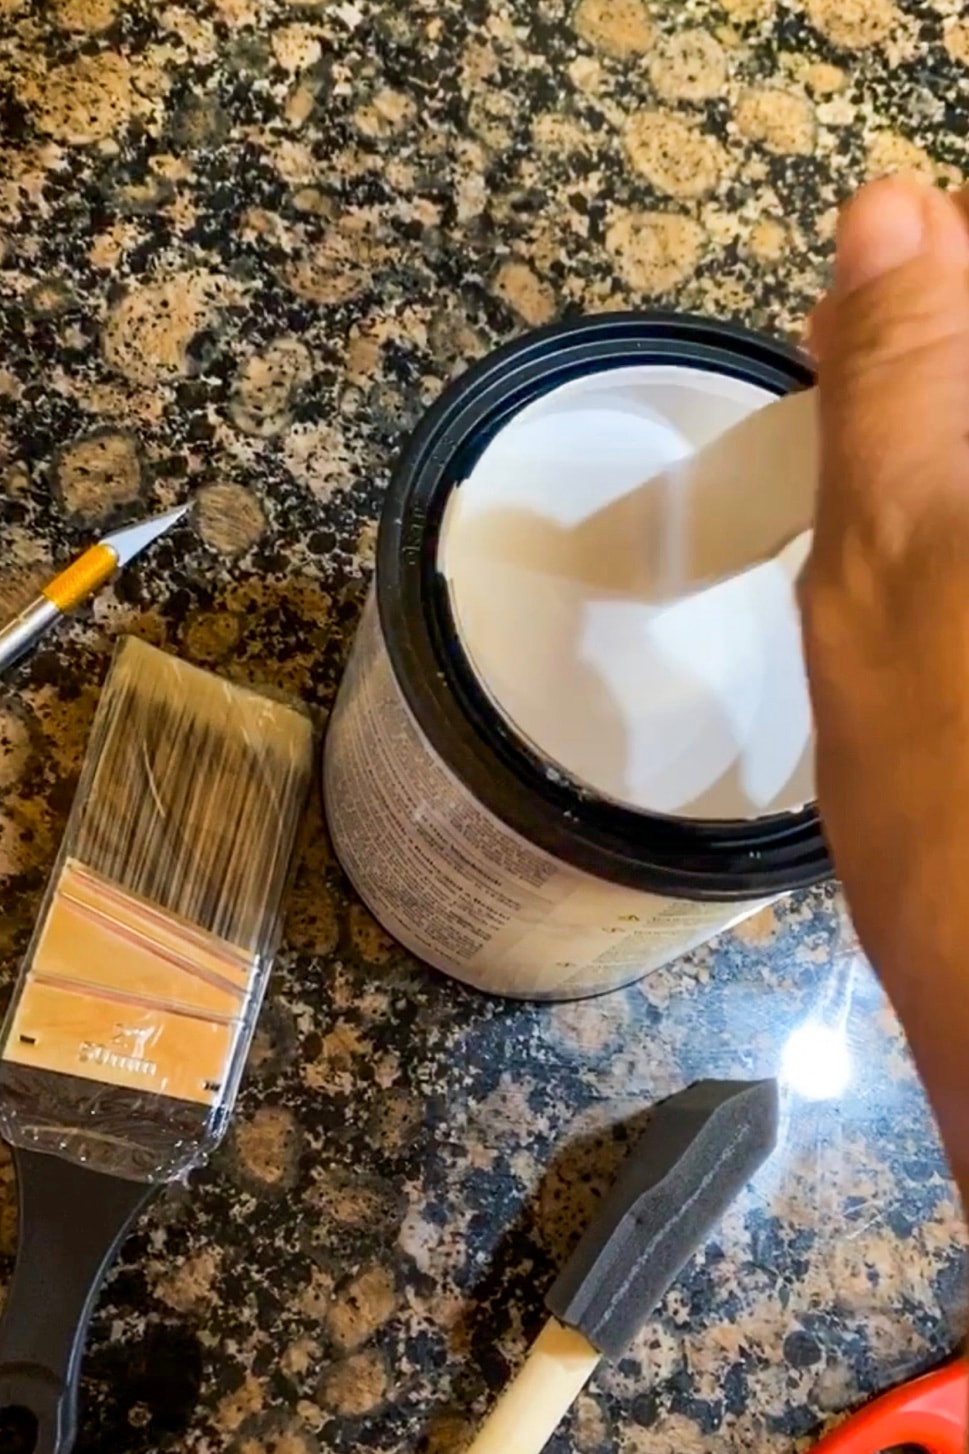 We watched the manufacturer’s video tutorial and followed the instructions provided to a T. We had zero DIY experience and found this to be simple with a low level of difficulty. The kit even comes with all of the brushes and tools needed to complete the project.  After one coat⬇️ 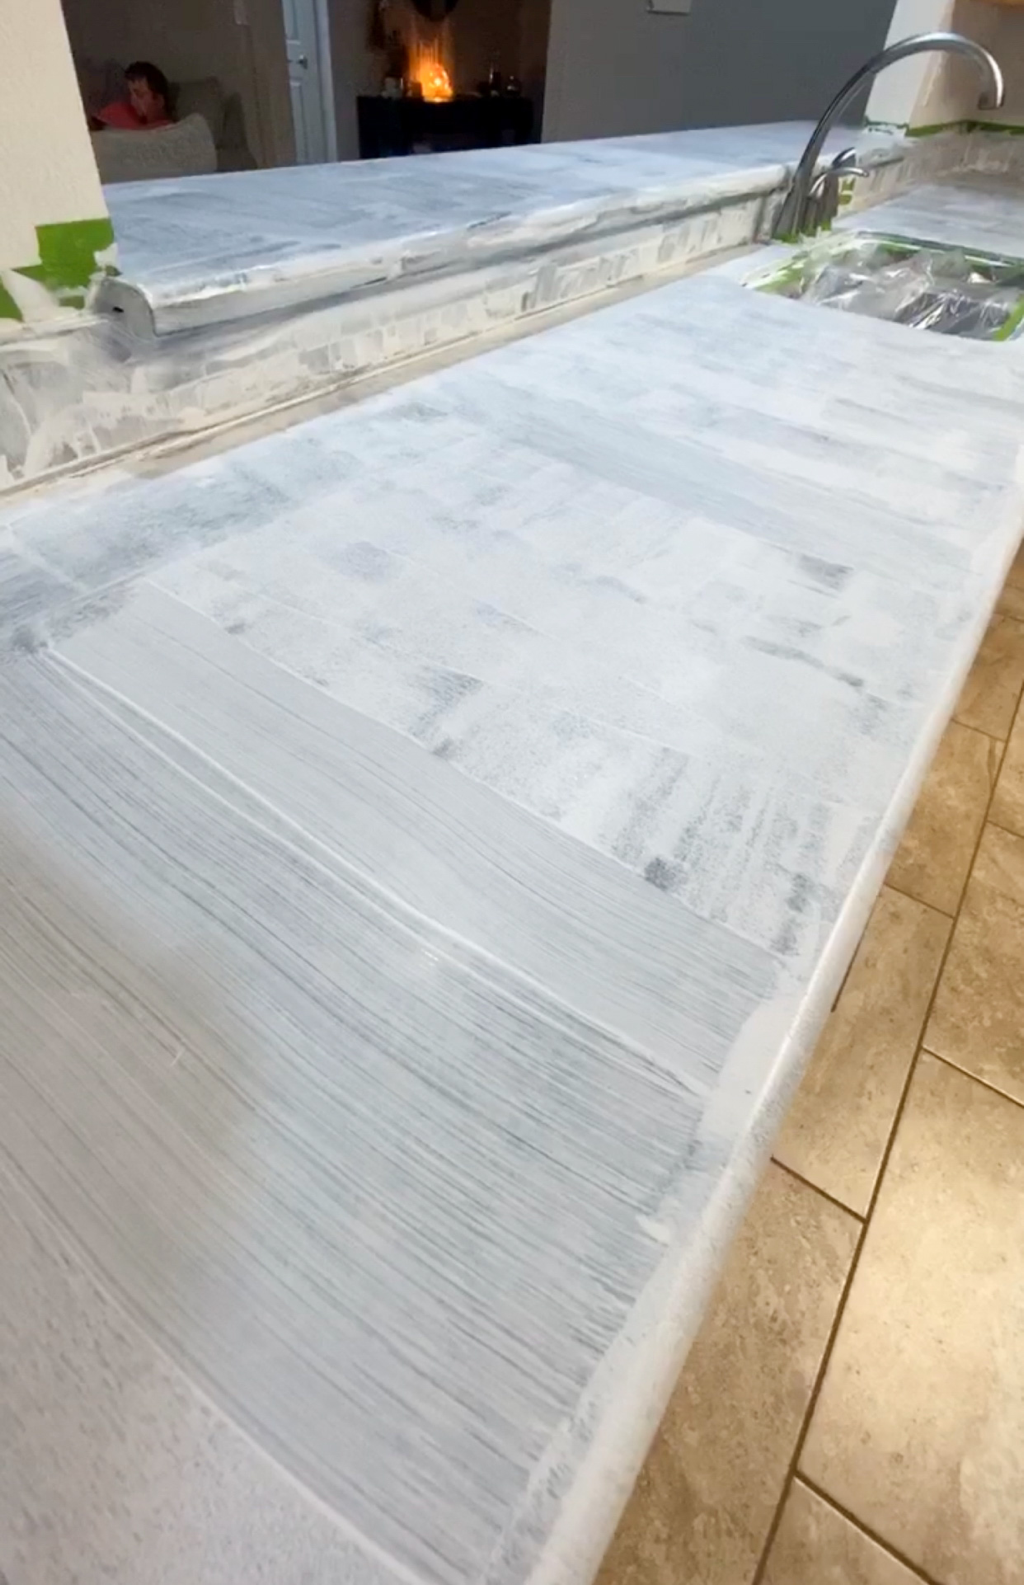 I will admit after one coat it looked quite scary! We ended up needing four coats to fully cover the dark granite. I think the hardest part was hand drawing on the gray marbling. I first sketched my desired design out on paper to get an idea of how it would flow from one counter spot to the next. The directions provided in the Giani video were very helpful for this as well. If you mess up you can quickly wipe away the marbling lines and start over which made the process much less stressful (though you have to be sure to wipe up your mistakes FAST)! 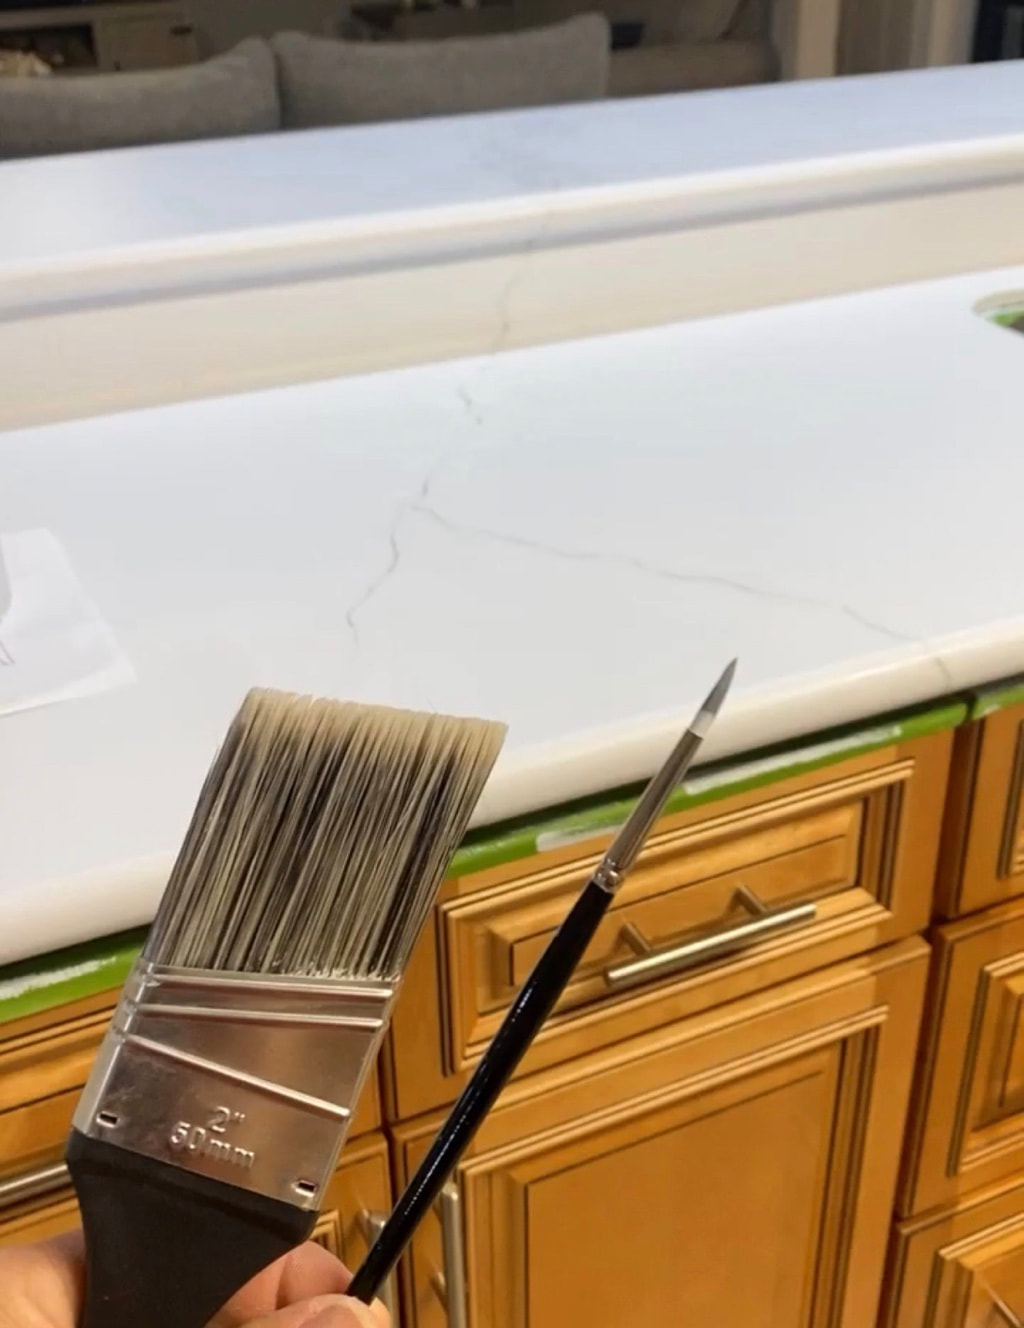 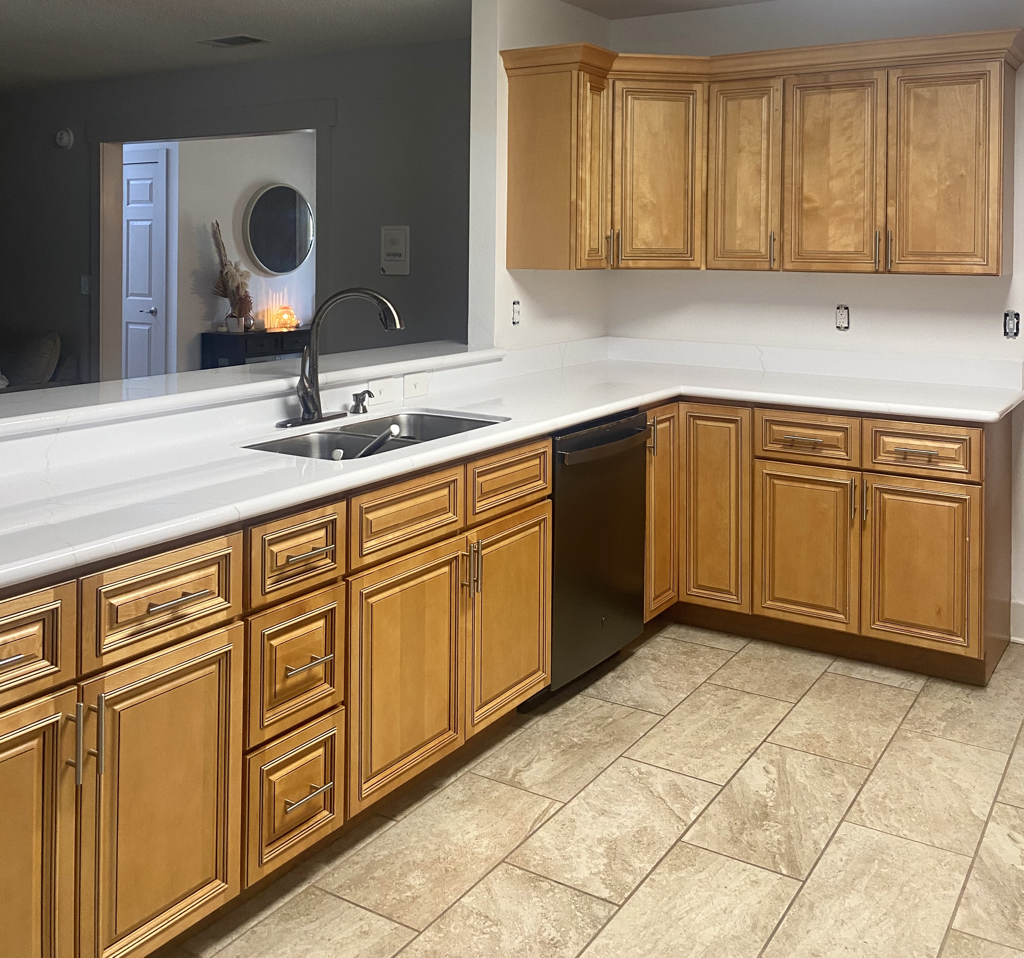 We waited the full suggested time before setting anything on top of the counters afterwards to allow it to fully cure, and have had zero issues with it so far. We do plan to do a full replacement and switch them out for quartz down the road but for now we are so happy with the change, and it only cost us about $200! Stay tuned because our next project will be painting the cabinets! This post was written in partnership with The Jerry Blankers Team and is published at www.jerryblankers.com/blog. All opinions are my own. If you are in need of a realtor in Whatcom County, WA, we used them for our most recent land purchase and home sales and I highly recommend them! You can give them a call at 360-410-1297 or email [email protected] or [email protected]. Instagram: @blankersrealestate
|
 RSS Feed